
Share this post


The biggest amount of time waste lies in feedback, the quickest way to get it is thanks to your IDE, and that's when ESLint comes into play.
The biggest amount of time waste lies in feedback : A writes some code, A waits for B to review the code, B makes 3 comments, A takes these comments into account, A waits for B to review the code, and so on…
As you know this is quite a cumbersome process, so how could you get feedback quicker ?
Feedback loop (feedback type / duration, inspired by Arnaud Lemaire's feedback loop)
As seen in the above graph, the quickest way to get feedback is thanks to your IDE. The problematic piece of code might get underlined and you’ll immediately see that there is something wrong with it.
Now as you might know, by default your IDE will only underline code that doesn't respect the rules of the language you are coding in, so that your code can always run. But if you want to add another set of rules to your IDE in order to underline bad code, a good way is to add ESLint to your project.
ESLint is a linter, it parses all your code and makes sure it respects all the rules you gave it. If it doesn’t, then it will underline the bad piece of code and tell you which rule it doesn’t follow. It might even propose a quick fix that can be automatically applied when clicked on. Here’s an example :

Example of bad code being underlined by ESLint
As you can see in the above example, console.log() commands are being underlined because it’s a built-in ESLint rule I added to my project configuration so that I would never leave a console.log() in my code.
Here's another built-in ESLint rule that I find useful :
=== and !==
By using this rules and even other ones that ESLint supports for the language you’re using, you will avoid dozens of comments in code reviews. Therefore avoid a lot of time waste.
Now if the rule you want to add to your project doesn’t exist in ESLint’s public plugin, a good practice you share among developers on your project for example, then you will have to write a custom ESLint rule.
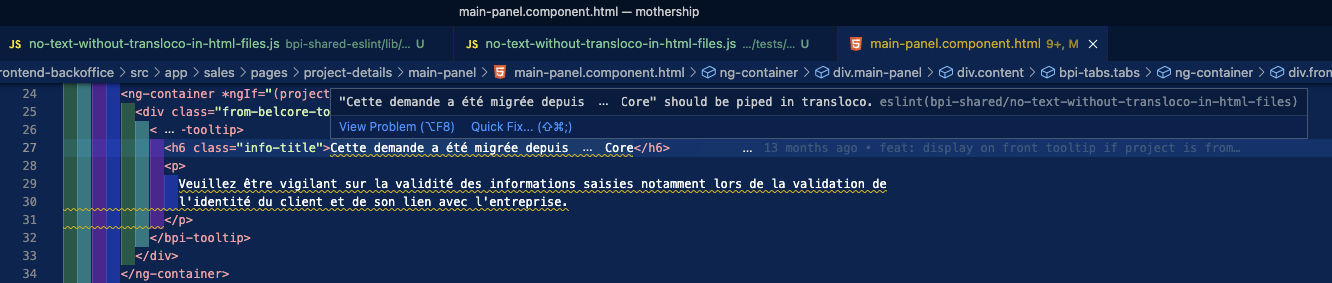
Example of bad code being underlined by ESLint, using a custom rule
As you can see in the above example, some code is being underlined because on this project we’re using transloco (tool that translates all your text “automatically”in the user’s language), so there’s never supposed to be any text hardcoded in html files. Therefore I wrote a custom ESLint rule that warns the developers if they leave hardcoded text in html files. If I wanted to I could even make it appear as an error and not just a warning so that the code couldn’t be pushed to the main branch.
This might sound like a long and complicated process, but in reality it’s fairly simple, and shouldn’t deter you from doing it.
In only an hour, you can write a simple ESLint rule and once you’ll have added it to your environment branches, it will be available to all the developers of your project.
Let’s start by giving you some context on how ESLint works.
The first first thing ESLint does is reading and parsing your code in order to build an Abstract Syntactic Tree (AST).
An AST is a data structure widely used to compute mathematical expression, like in a calculator.
Here’s an example :
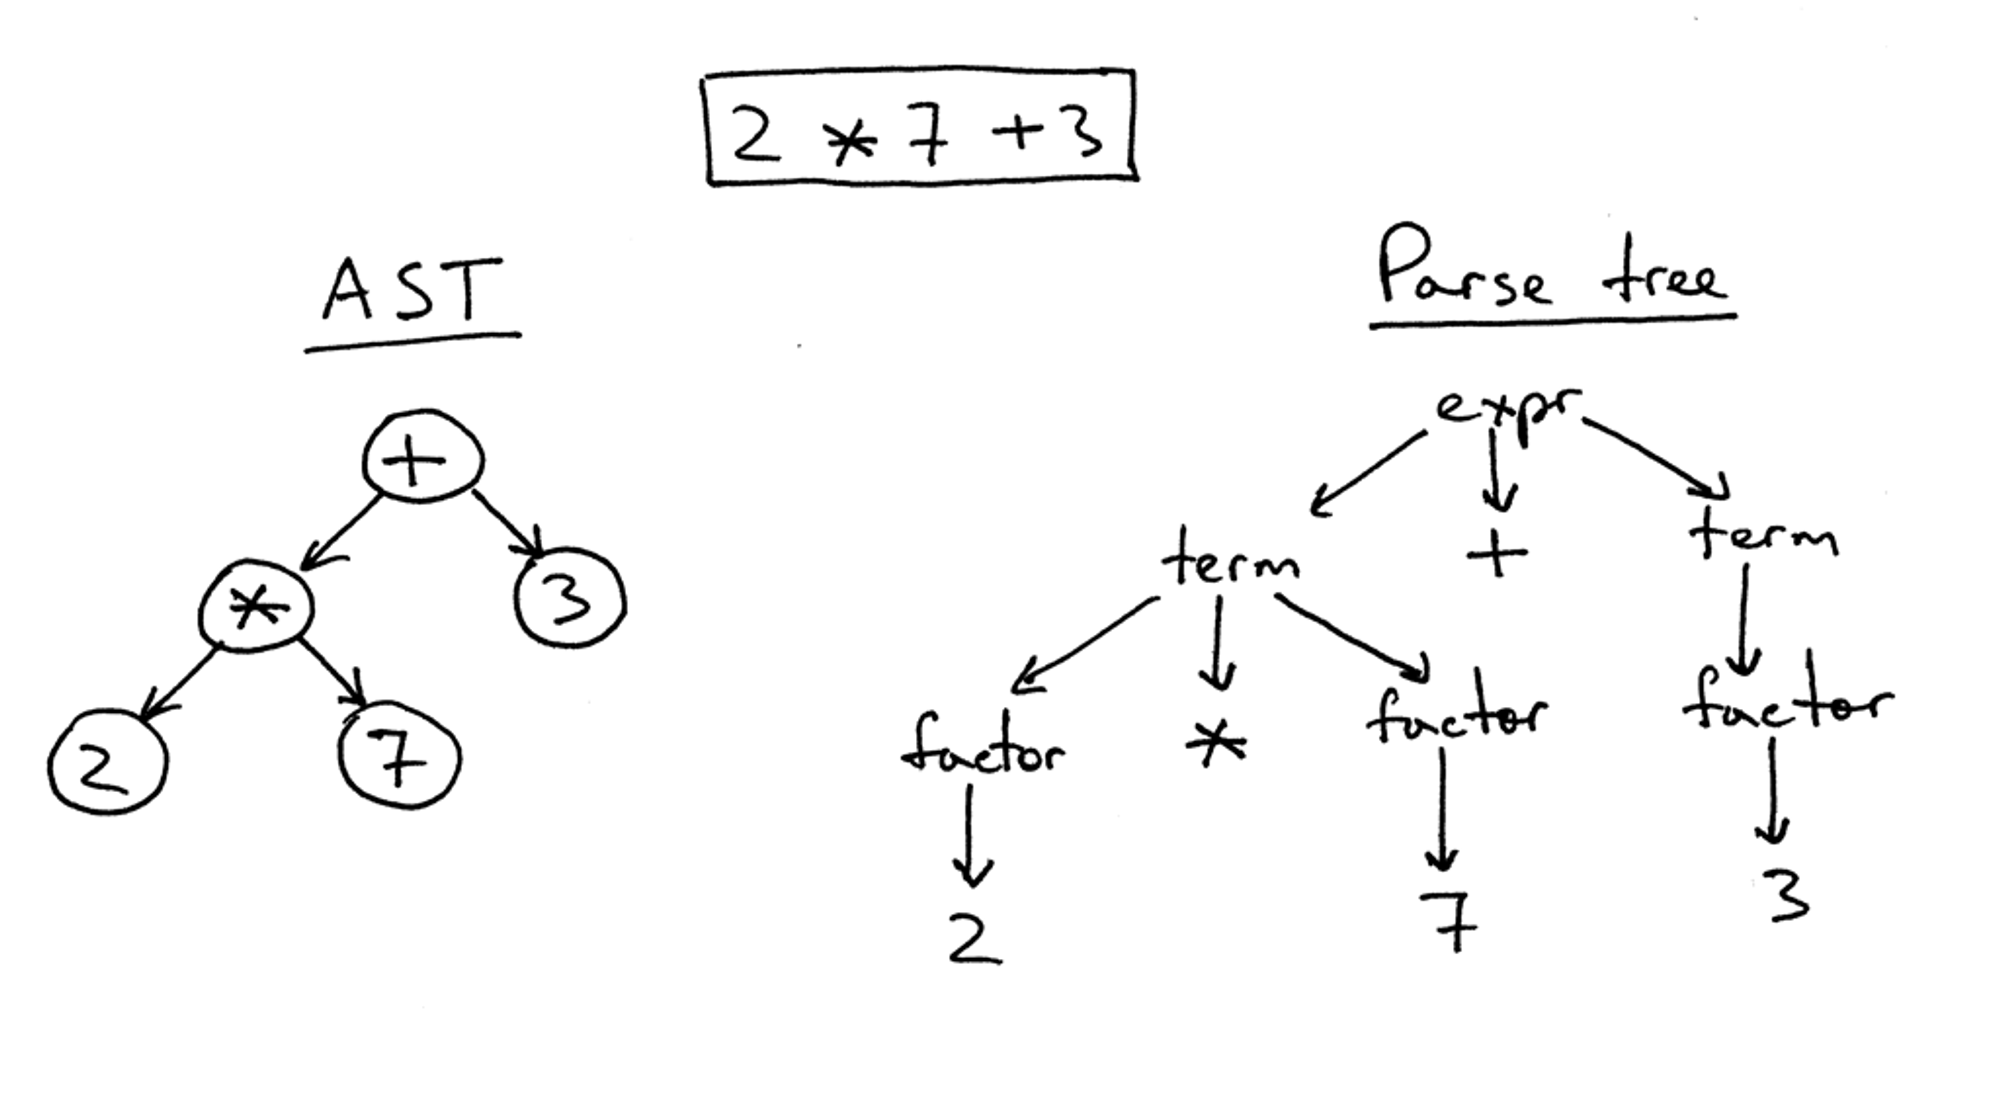
Example of an AST for a simple mathematical expression (image from Ruslan's Blog)
With the AST of your code that ESLint will have built, it will check that your code respects all the rules you added to your ESLint configuration.
Now to the practical work :
First thing you should do is add the correct parser to your project. In order to lint html files in angular for example, you’ll need the @angular-eslint/template-parser :
npm i @angular-eslint/template-parserStart by defining what your rule should do. Fill the doc <id-of-your-generated-rule>.md
Then complete the test file
.html files so we’ll use @angular-eslint/template-parserYour test file should look like this:

Example of a test file for a custom ESLint rule
Now write your rule :
1. Define the “level” of your rule, here we want to prevent a behaviour, so let’s make it a problem (it could also be a warning or info level)
2. Add the message you want to show
3. Find out what kind of node you want to iterate on, don’t hesitate to use this awesome tool
HTML for us@angular-eslint/template-parserHere’s how it looks in our case: (the circled type)
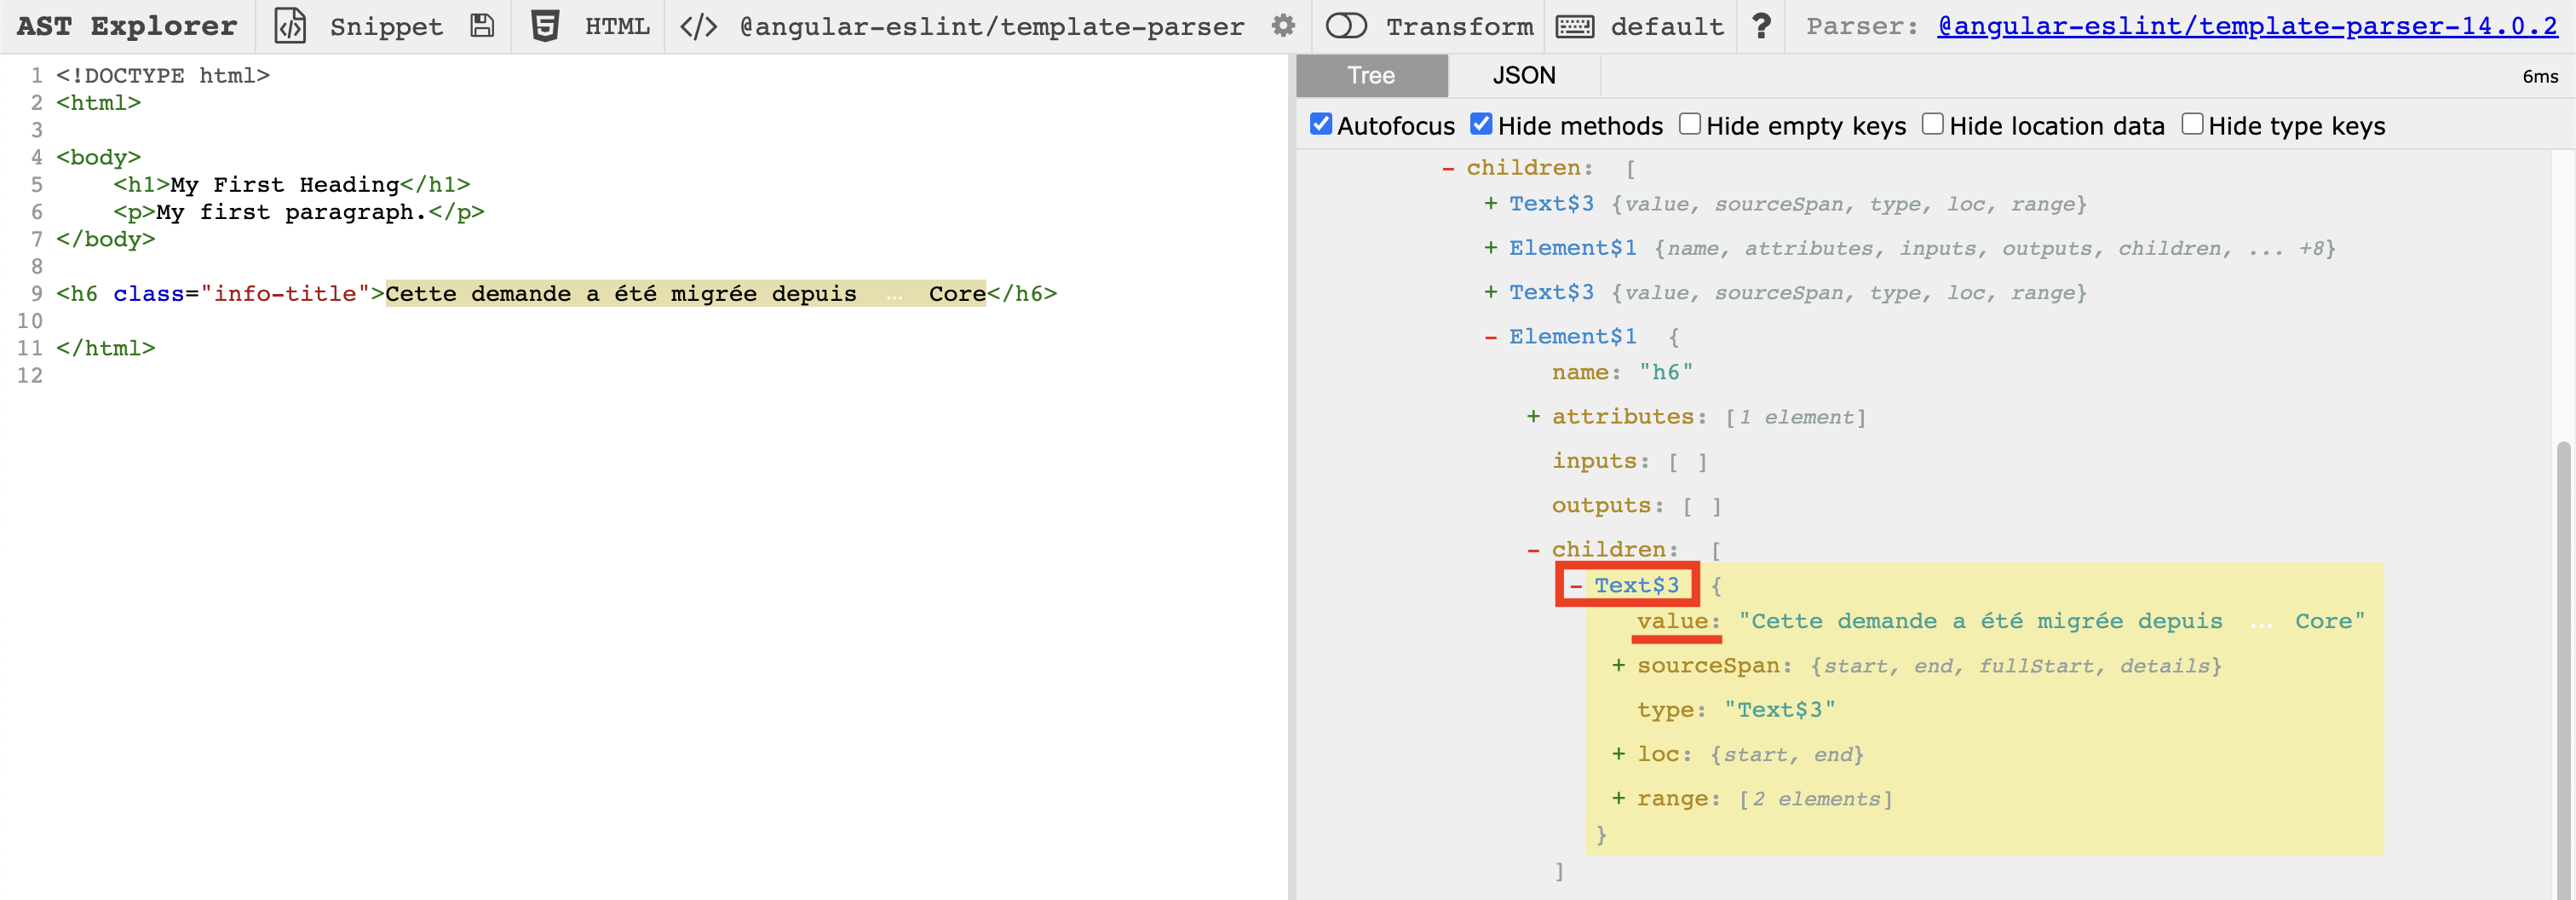
Example of using AST Explorer
4. Add a condition for your code to be considered invalid
In our case we want the code to be considered invalid if: (check the underlined properties in the screenshot above ⬆️)
node.value !== undefinedstringContainsText(node.value)!node.value.includes('transloco')5. Add any helper function
Your rule should look somewhat like this :.png)
Example of implementation for a custom ESLint rule
6. Now test your code : npm run test
7. Or if you only want to test a specific file : (no output means no error)
node <relative-path-of-your-file>
8. Finally, let’s watch your custom rule in action
In the .eslintrc.json file, put your wanted configuration, it should look similar to this :
.png)
Example of configuration for ESLint
9. Go to some files and check how it looks :
Final result of the custom ESLint rule shown in this article
As we’ve seen together :
I can only encourage you to take the step and write your own custom rules to benefit from the full power of ESLint.
To go further, and have more details about it's workings, here's the official documentation of ESLint.
