
Share this post


In that article, you will learn what is mutation testing and how to use it with Pitest. Then, I will share my journey of bug detection on a real project.
It has been proven that lack of testing leads to excessive expenses, delayed product launch, dissatisfied users, and leads to bad product brand reputation.

As a software engineer, you can contribute to high quality and make a difference by writing tests — especially unit tests.
However, if you want to improve your tests suite quality you will first need to evaluate your tests. One easy way to achieve that is to measure your code coverage. This article describes five kinds of code coverage:
Once you have the metric you can set up an objective. For example, at Sipios we stand that at least 80% of the branch have to be covered otherwise you won’t be able to merge your code. But you need to be careful when you reach this limit: low code coverage means insufficient testing, but high coverage doesn’t guarantee a high test quality.
The most simple example to visualize is that you can execute all your codebase during testing and assert nothing. For branch coverage, it can also be explained by the fact that less complex branch tends to be easier to cover.
One solution to increase the quality of your tests is called mutation testing.
Mutation testing was originally proposed by Richard Lipton in 1971. According to Wikipedia, it’s based on two hypotheses:
The first is the competent programmer hypothesis. This hypothesis states that most software faults introduced by experienced programmers are due to small syntactic errors.
The second hypothesis is called the coupling effect. The coupling effect asserts that simple faults can cascade or couple to form other emergent faults.
It’s a two-step process: first, generate mutants, then try to kill them with your tests.
The first step consists in generating a different version of your code. If you are familiar with Genetic Algorithm (GA) used in optimization and search problems it can be seen as the initialization’s step when you generate a population.
This method requires only your code and the selection of a set of mutation operators. Then you need to apply these operators to the source code one at a time for each applicable statement of the program. The result of applying one mutation operator to the program is called a mutant. The commonly used mutation operators are:
+ with *, - with /> with >=, == and <=For example, if you use only the operator that replaces * with / in the following method:
public int multiply(int a, int b) {
 return a * b;
}
You will get the nice division method that follows:
public int multiply(int a, int b) {
 return a / b;
}
Mutants generated with two or more operators are referred to as higher-order mutants (HOM). We will not discuss HOM Testing in this article but you can find interesting papers on how you can efficiently generate them.
Killing a mutant is an easy process. You only need to run the tests on the mutant. If one of your tests is red you killed it. Otherwise, if all your tests are green the mutant survived.
Once you performed your tests on all the mutants you can compute a mutation score. The mutation score of your tests can be gauged from the percentage of mutants killed. The higher your mutation score is, the more effective your test suite is.
To understand that, let’s imagine that we’ve tested our multiplication method with the following test:
@Test
public void multiplyInts() {
    assertEquals(7, multiplicationService.multiply(7, 1));
}
According to code coverage, the multiply method is 100% covered but the mutant which is a divide method will survive. In that case, it will give us a 0% mutation score. Hopefully, we can add a test that multiplies 2 and 3 to have a 100% mutation score.
Now that we know the basics let’s see how it works in practice.
In this section, you will learn what is Pitest and how to use it on a java project using maven. We will also see what are the alternatives.
According to pitest.org:
PIT is a state-of-the-art mutation testing system, providing gold standard test coverage for Java and the jvm. It’s fast, scalable, and integrates with modern test and build tooling.
Installation with maven is straightforward with the maven quickstart, other quickstarts for gradle, ant, or the command line can be found here.
Basically, you only need to add the plugin to build/plugins in your pom.xml
<plugin>
    <groupId>org.pitest</groupId>
    <artifactId>pitest-maven</artifactId>
    <version>LATEST</version>
 </plugin>
There is a huge amount of configuration options that are available on the quickstart page and that can be used to customize your analysis. For example, you can specify the target classes and the target tests like that:
<configuration>
    <targetClasses>
        <param>fr.service.MultiplicationService</param>
    </targetClasses>
    <targetTests>
        <param>fr.service.MultiplicationServiceUnitTest</param>
    </targetTests>
</configuration>
Then, you can generate a full HTML report using the mutationCoverage goal with the command:
mvn org.pitest:pitest-maven:mutationCoverageBe careful, Pitest requires that you run the mutation testing analysis again a green tests suite so you may need to run your tests to assert that everything is working properly.
The reports produced by PIT are in an easy-to-read format combining line coverage and mutation coverage information. It can be found in target/pit-reports/YYYYMMDDHHMI .
In our example, we retrieve a 100% line coverage associated with a 50% mutation score.

The details can be found if you click on the class name. Pitest will show you exactly which mutants survived and the mutation operators that were used in the report. It looks like this.
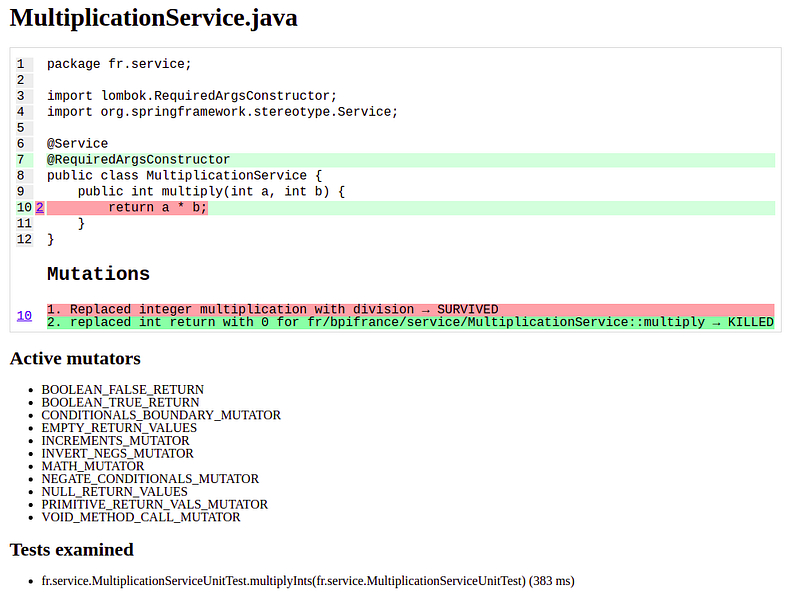
As expected in the previous part, we can greatly improve the quality of our tests by adding a test that catches the first mutant.
After adding this new test we can set up a minimum mutation coverage threshold by adding the -DmutationThreshold option like that:
mvn org.pitest:pitest-maven:mutationCoverage -DmutationThreshold=85If you are not using Java I recommend you to check the top 21 Mutation Testing Open Source Projects.
Let’s talk about my journey with mutation testing. There is a lack of evidence that writing tests for mutants improves test quality. That’s why my goal was to find a mutant that can be a bug.
Creating too many mutants
Generating mutants for every statement of your code with multiple mutation operators will generate an army of mutants. Then, you need to run your tests on each mutant. This is a process that requires a lot of computation and if you are not careful you will wait for a long time at the end of the analysis.
I am working on a project with more than 15 microservices and I added the Pitest configuration in the parent pom.xml. I started without targeting some class or package because unit tests can be placed differently in the different subprojects. It’s generated more than 5,000 mutants per microservices.
Considering useless mutants
Some mutants are not interesting especially the ones generating from DTO. Pitest can generate mutation on the method provided by annotation such as the @Data from Lombok. These are mutants you want to avoid because most of the time you are not overriding the method provided by annotations.
Including integration tests
Integration tests take longer than unit tests. By default, Pitest uses a 4s timeout to avoid being locked in an infinite loop. If your integration tests are slow you may have to wait for 4s for each integration test times the number of mutants you have generated. In other words, it can take days to finish. Don’t try it, please.
Even if it is finished you need to be able to read the report
You can still try to generate a report on all your code using all your tests. It will take too long to be used in an automated process (it took me 23s on a service with only 15 unit tests) and you will have too many mutants who will survive. Imagine having a 90% mutation score on my 5000 mutants it will let me with still 500 mutants to analyze. I think it is easier to start small and then try to generate the way you analyze the report. The process of running mutation testing and analyzing the report is time-consuming.
First, you need to find a piece of interest. In my case, it was a service from an API that my team “owns”. It means that we are responsible for this part of the code.
I choose a service because it’s the place where the logic should be implemented in an API. The service I choose was a good piece because the code has more than 1,000 lines and it has at least 18 contributors according to git blame. The coolest part of this service was that some parts of the code were written more than a year ago and some lines only 2 weeks ago.
Last but not least, this service is covered by 96% line coverage and 93% branch coverage when you execute all the tests.
That’s typically the kind of service where someone will do some changes soon and my team will have to review these changes. So let’s try to do some changes first and see if it can break the code.
Analyzing scores
The first thing I saw after generating the report was that we only have a 50% line coverage with unit tests and a 34% mutation score.
I felt disappointed by the 50% line coverage because it seemed poorly tested but it is easy to understand. Indeed, most of the time we are adding methods on services to create new routes for a controller. Then, people tend to do integration tests first. Since the integration tests use the service and its methods you will have a high code coverage score. When you reached the standard of 80% of code coverage you are not considering writing unit tests because the metrics show you that you did your job well.
I don’t know how to analyze the 34% mutation score. It seems not so bad according to code coverage. I also tested that integration tests can kill some mutants. In reality, we have less than 66% of mutants that can survive all tests.
Analyzing the survivors
We killed 39 mutants on 114. We have 75 survivors left to analyze. It means that that if I commit and push the mutant my unit tests on that service won’t see it. As I explained before other tests can still kill these mutants so it would require a long time to test each mutant against all the tests. We need to have a better method here.
The first thing you can do is to focus on some of the mutation operators. In my service I focused on the mutations operators that survive the most:
I assume that statement deletionis the easiest operator to analyze. Indeed, you only need to delete the line and see if the code still makes sense. Most of the time, these mutants occur on the setter methods of an object. Sometimes, it can occur on API calls but it’s always caught by the integration tests.
Null return values are also easy to analyze and can create huge damages. It’s interesting to see that null return values can be achieved with the statement deletion of the setter. You can imagine creating a higher-order mutant in real life only by deleting a setter call. I think it can be an interesting thing to check when you are doing defensive programming.
I can do it!
After analyzing only a few mutation operators I was able to create my first bug using mutation testing. It took me 30 minutes and only a conditional negation.
This can seem alarming because when you are refactoring the code you can miss these kinds of mistakes. In practice, we have a long process that will catch almost all these mistakes before the bug goes to production. Indeed, you have to test your feature locally before creating a merge request. Here, I would have caught the bug. Then, we have a code review where my colleagues should have caught the bug. Then, the feature is tested by the PO in the development environment and by QA in preproduction.
However, in a lean environment, we all know that the sooner we catch errors the better it is. We don’t want to waste time. That’s why I think that Mutation Testing is a great tool to make developers understand the usefulness of a test and to make sure that the feature will continue to provide high quality even after someone changes something on it.
Doing it right the first time
Mutation Testing helped me to realize that our process leads to great quality. We have a long process that prevents developers from creating bugs in production. I highly recommend you to create yours and to be uncompromising in the process. I think that Mutation Testing should occur after to help you to improve your process or if you are working in safety or security-related sectors.
I also realized that we can improve our tests by helping developers to be more precise when they wrote a test. The separation between integration and unit tests should be well known, and we should use both kinds of tests. I assume that TDD can help to achieve that by focusing first on unit tests instead of creating integration tests first. It would increase the mutation score.
Mutation Testing helped me to realize that a test is not necessarily pertinent. That’s why I would use it for my next refactoring. Unfortunately, it’s lacking tools to help you to automatize the analyzing phase. You should stay tuned to see how it will evolve and what higher-order mutants can bring.
