
Share this post


Easily Create and Deploy a Spring Boot API Using AWS ! By the end of the tutorial, we will have a deployed API with the 4 endpoints of a CRUD API.
After successfully creating and deploying an API, I wanted to share with you my experience building a Spring Boot API and deploying it using AWS.
Last month, I wanted to quickly build an efficient API able to list items. I went through these interrogations: How to build an API from scratch? How to start a project? Which technology to adopt, for my need?
Why Spring Boot and AWS ?
Spring Boot is a Framework for java projects. Its main advantages are dependency injections, auto-configuration, and easy deployment thanks to an integrated Tomcat WebServer. This framework will allow us to quickly build scalable and maintainable web API.

AWS stands for Amazon Web Services. It is a list of cloud services provided by Amazon. To efficiently deploy our API, in this tutorial we will use two services of AWS: RDS for our database and ElasticBean for our Spring Boot API.
What to expect at the end of this tutorial?
By the end of the tutorial, we will have a functional deployed API, connected to a database with the 4 basic endpoints of a CRUD API: create, read, update and delete.
Prerequisites:
Skills:
To make the most of this tutorial, you should know the basics of:
Adequate tools:
You will need to install the following tools on your computer:
Setup your AWS Account:
In order to deploy your API to AWS, you will need an AWS account. This will require you to have a credit card. However, all the actions of this tutorial can be made using the AWS free tier. You will not have to pay. Click here for an easy tutorial.
Step 1 - Creation of a local database:
We will use docker to easily create a database. Docker will allow our database to be launched inside a container. It’s one of the easiest ways to launch a database.
How to use it:
— Copy this docker-compose file in a file named docker-compose.yaml.
version: '3.1'

services:

  db:
    platform: linux/x86_64
    image: mysql:5.7
    restart: always
    ports:
      # <Port exposed> : < MySQL Port running inside container>
      - '3306:3306'

    environment:
      MYSQL_DATABASE: 'db'
      # So you don't have to use root, but you can if you like
      MYSQL_USER: 'user'
      # You can use whatever password you like
      MYSQL_PASSWORD: 'password'
      # Password for root access
      MYSQL_ROOT_PASSWORD: 'password'
At the next step, we will place your docker-compose at the root of your project folder (although this is not compulsory, it’s a good practice). For the moment you can leave it where you want.
How to check that everything is working properly ?
Open TablePlus and create a new connection to a database. Then enter the following parameters:
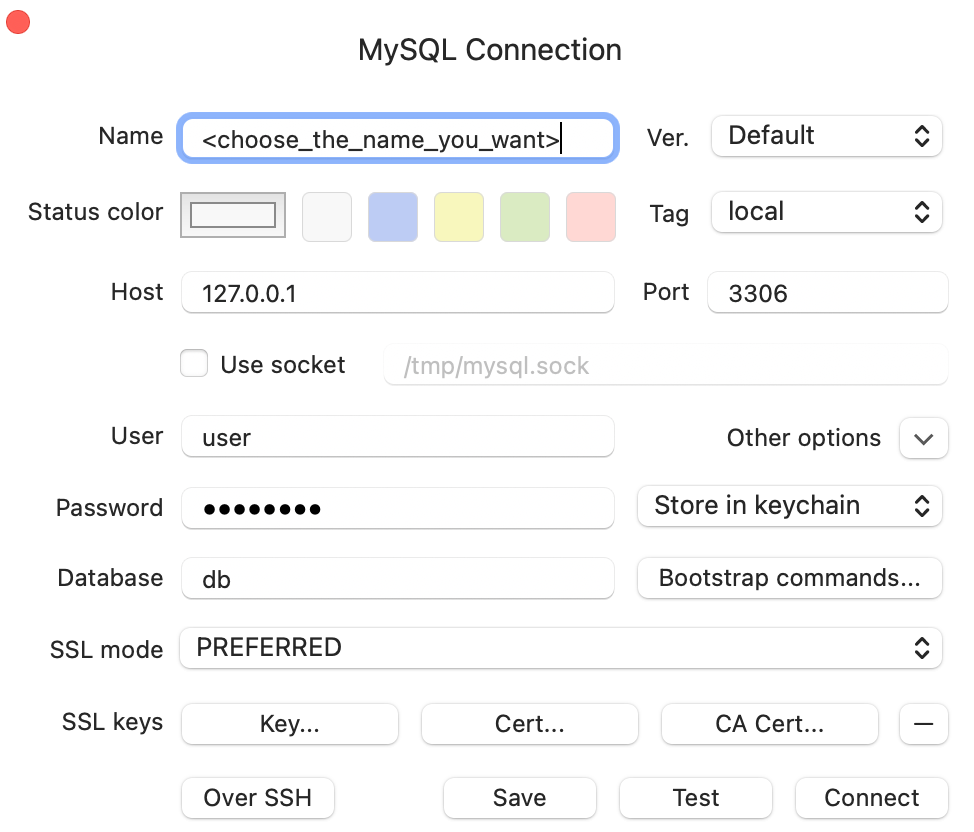
Click on the Test button. The connection should succeed and you should see the following in TablePlus:
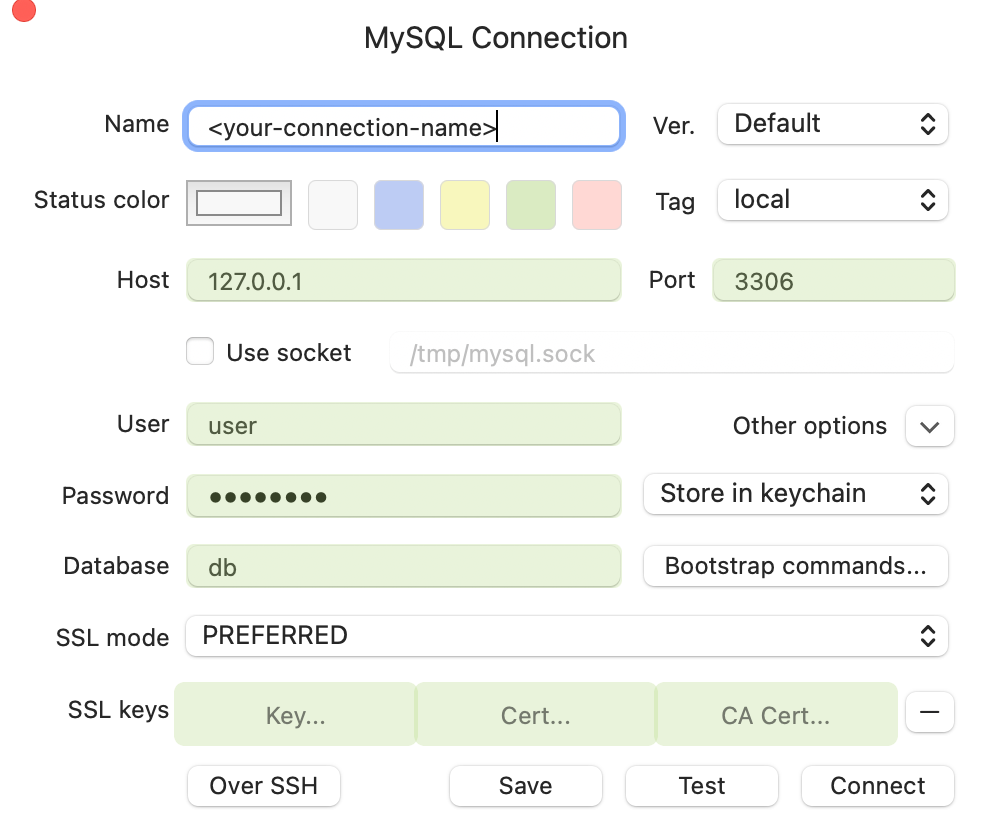
Then click on the Connect button and it’s done. Congratulations! You have created your local database 🎉.
Step 2 - Creating and developing your Spring Boot API
Step 2.1 - Generating the project
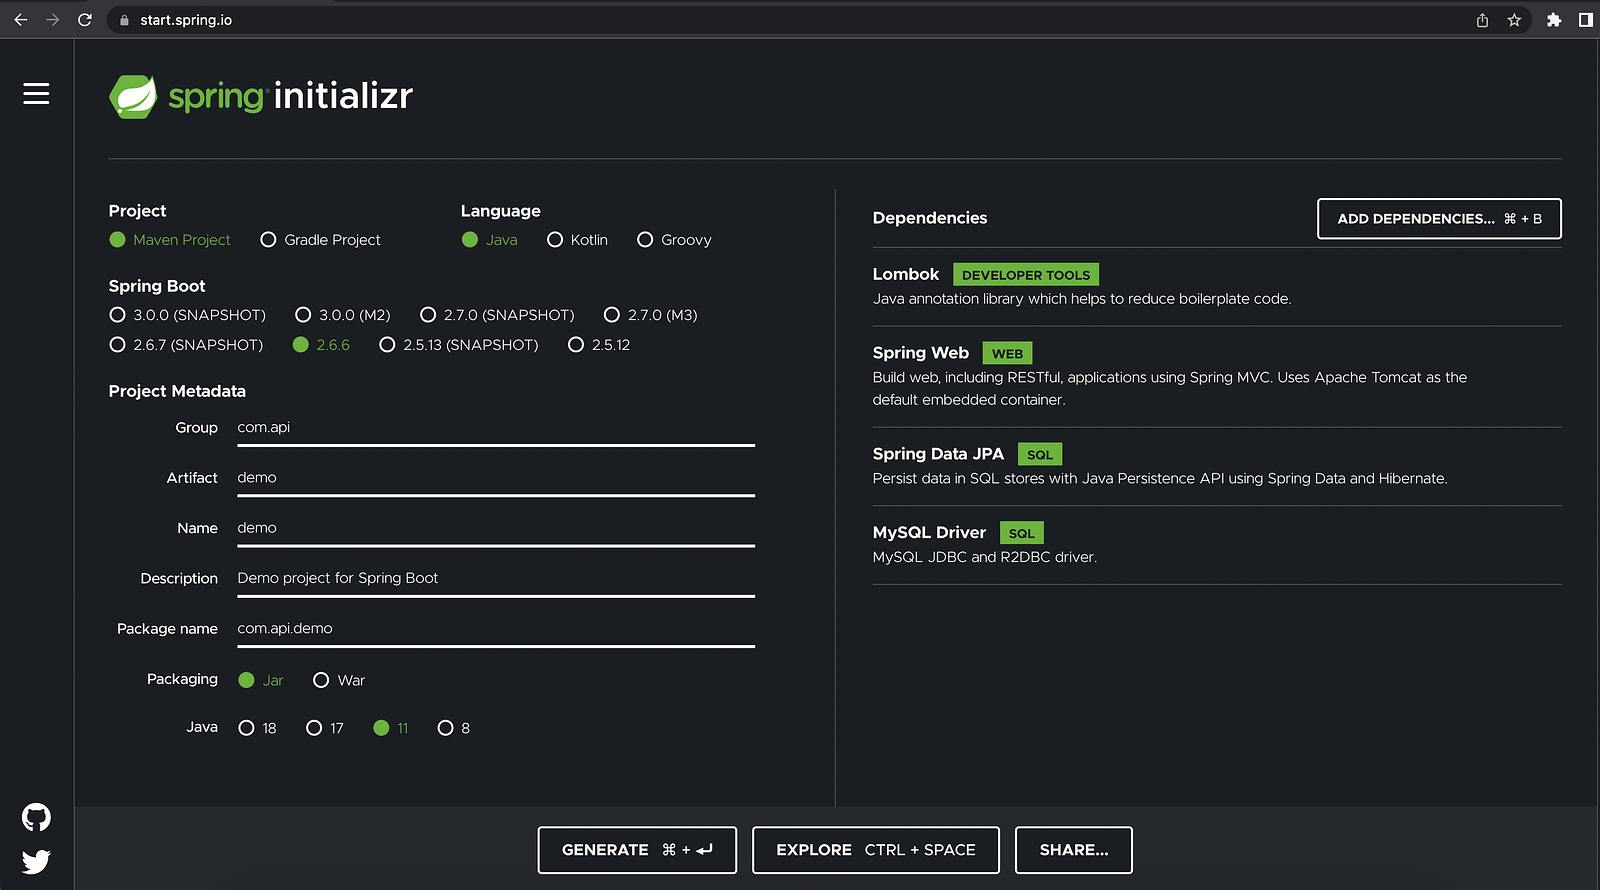
A spring boot project must follow a specific folder architecture. To comply with it, we will generate the project using Spring Initialiser. It is a very useful tool to generate a minimal working configuration for a spring boot project. For this, go to this website: https://start.spring.io/ and choose the following parameters:
We should have the following project tree:

Then open your project with your favorite editor. You will now connect your API to the database that we have created previously. You have only 5 lines to write and the spring boot API will connect to your database! We see here one of the advantages of Spring Boot: Less time coding by doing configuration instead (You don’t have to code a connector for the database, but just to specify the database parameters).
For the connection to proceed, write the following in your application.properties file:
spring.datasource.driver-class-name=com.mysql.cj.jdbc.Driver

spring.datasource.url= jdbc:mysql://localhost:3306/db
spring.datasource.username=user
spring.datasource.password=password
#Tomcat configuration
server.port=8081
The last line (server.port=8081) is to replace the default port of your API. We do this to avoid some bugs later when deploying it to AWS.
Now we are going to test our API. Again, spring boot is easy! There are 2 straightforward ways to lunch our API locally:
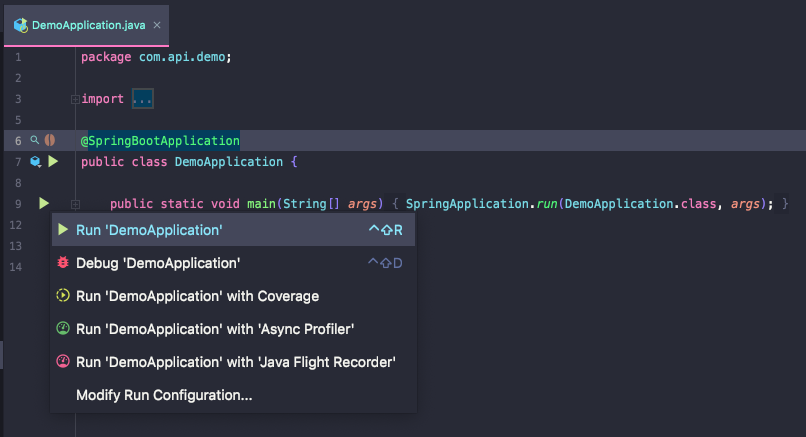
The first one is through our editor. In IntelliJ, go to the Application.java file and run Application.
We see here again the magic of Spring Boot: @SpringBootApplication is a very powerful annotation that is the equivalent of the 3 below annotations:
The second one is by using the terminal. Go into the folder of your API and type the following: $mvn spring-boot:run
You should have the following log: “starting api application in x seconds”. And a log above it will indicate on which port the server is listening.

Congratulation 🎉 You have successfully created your first Spring Boot API! Now, we will enhance it by adding new routes.
Step 2.2 - Writing our CRUD controller:
Create a package named item inside com.api.demo and then add the following files:
package com.api.demo.item;

import lombok.Data;

import javax.persistence.*;

@Data
@Entity
@Table(name = "item")
public class Item {
    @Id
    @GeneratedValue(strategy = GenerationType.IDENTITY)
    private Long id;

    private String title;

    @Column(name="full_description", columnDefinition = "TEXT")
    private String fullDescription;

    private String price;
}
package com.api.demo.item;

import org.springframework.data.repository.CrudRepository;
import org.springframework.stereotype.Repository;

@Repository
public interface ItemRepository extends CrudRepository<Item, Long>{
}
spring.jpa.hibernate.ddl-auto=update
package com.api.demo.item;

import lombok.Data;
import org.springframework.beans.factory.annotation.Autowired;
import org.springframework.stereotype.Service;

import java.util.Optional;

@Data
@Service
public class ItemService {

    @Autowired
    private ItemRepository itemRepository;

    public Optional<Item> getItem(final Long id) {
        return itemRepository.findById(id);
    }

    public Iterable<Item> getAllItems() {
        return itemRepository.findAll();
    }

    public void deleteItem(final Long id) {
        itemRepository.deleteById(id);
    }

    public Item saveItem(Item item) {
        Item savedItem = itemRepository.save(item);
        return savedItem;
    }

    public Item updateItem(Long id, Item newItem) throws ItemNotFoundException {
        Optional<Item> currentItemOptional = getItem(id);
        if (currentItemOptional.isPresent()) {
            Item currentItem = currentItemOptional.get();
            currentItem.setTitle(newItem.getTitle());
            currentItem.setFullDescription(newItem.getFullDescription());
            currentItem.setPrice(newItem.getPrice());
            saveItem(currentItem);
            return currentItem;
        } else {
            throw new ItemNotFoundException(id);
        }
    }
}
package com.api.demo.item;

import org.springframework.beans.factory.annotation.Autowired;
import org.springframework.web.bind.annotation.*;

import java.util.Optional;


@RestController
public class ItemController {

    @Autowired
    private ItemService itemService;

    /**
     * Create - Add a new item
     *
     * @param item An object item
     * @return The item object saved
     */
    @PostMapping("/item")
    public Item createItem(@RequestBody Item item) {
        return itemService.saveItem(item);
    }

    /**
     * Read - Get one item
     *
     * @param id The id of the item
     * @return An Item object full filled
     */
    @GetMapping("/item/{id}")
    public Item getItem(@PathVariable("id") final Long id) throws ItemNotFoundException {
        Optional<Item> item = itemService.getItem(id);
        if (item.isPresent()) {
            return item.get();
        } else {
            throw new ItemNotFoundException(id);
        }
    }


    /**
     * Read - Get all items
     *
     * @return - An Iterable object of Item full filled
     */
    @GetMapping("/items")
    public Iterable<Item> getAllItems() {
        return itemService.getAllItems();
    }

    /**
     * Update - Update an existing item
     *
     * @param id      - The id of the newItem to update
     * @param newItem - The newItem object updated
     * @return - The item updated
     */
    @PutMapping("/item/{id}")
    public Item updateItem(@PathVariable("id") final Long id, @RequestBody Item newItem) throws ItemNotFoundException {
        return itemService.updateItem(id, newItem);
    }


    /**
     * Delete - Delete an item
     *
     * @param id - The id of the item to delete
     */
    @DeleteMapping("/item/{id}")
    public void deleteItem(@PathVariable("id") final Long id) {
        itemService.deleteItem(id);
    }
}
package com.api.demo.item;

import org.springframework.http.HttpStatus;
import org.springframework.web.bind.annotation.ResponseStatus;

@ResponseStatus(value = HttpStatus.NOT_FOUND)
public class ItemNotFoundException extends Exception{

    public ItemNotFoundException(Long id){
        super(String.format("No item were found for id : %s", id));

    }
}
The project structure is now the following:
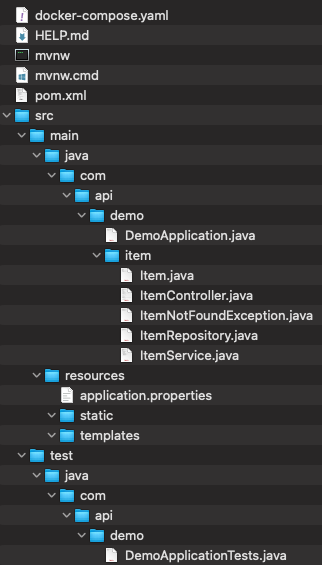
For more information about how to code in SpringBoot, visit this link. I will here briefly explain what each file is doing:
There is no need to define the table in another place. Our API will create it automatically using the model -> No duplication of code :)
Step 2.3 - Starting your API locally:
Let’s start the API in the same way that we did before (either via IntelliJ or via a terminal). You should have the following log: “starting api application in x seconds”.
To test our endpoints, we will use Postman.
We will test the 5 endpoints that we have created (Post, Get One, Get All, Patch, and Delete).
Here is a small test, adding two items and then reading all items:
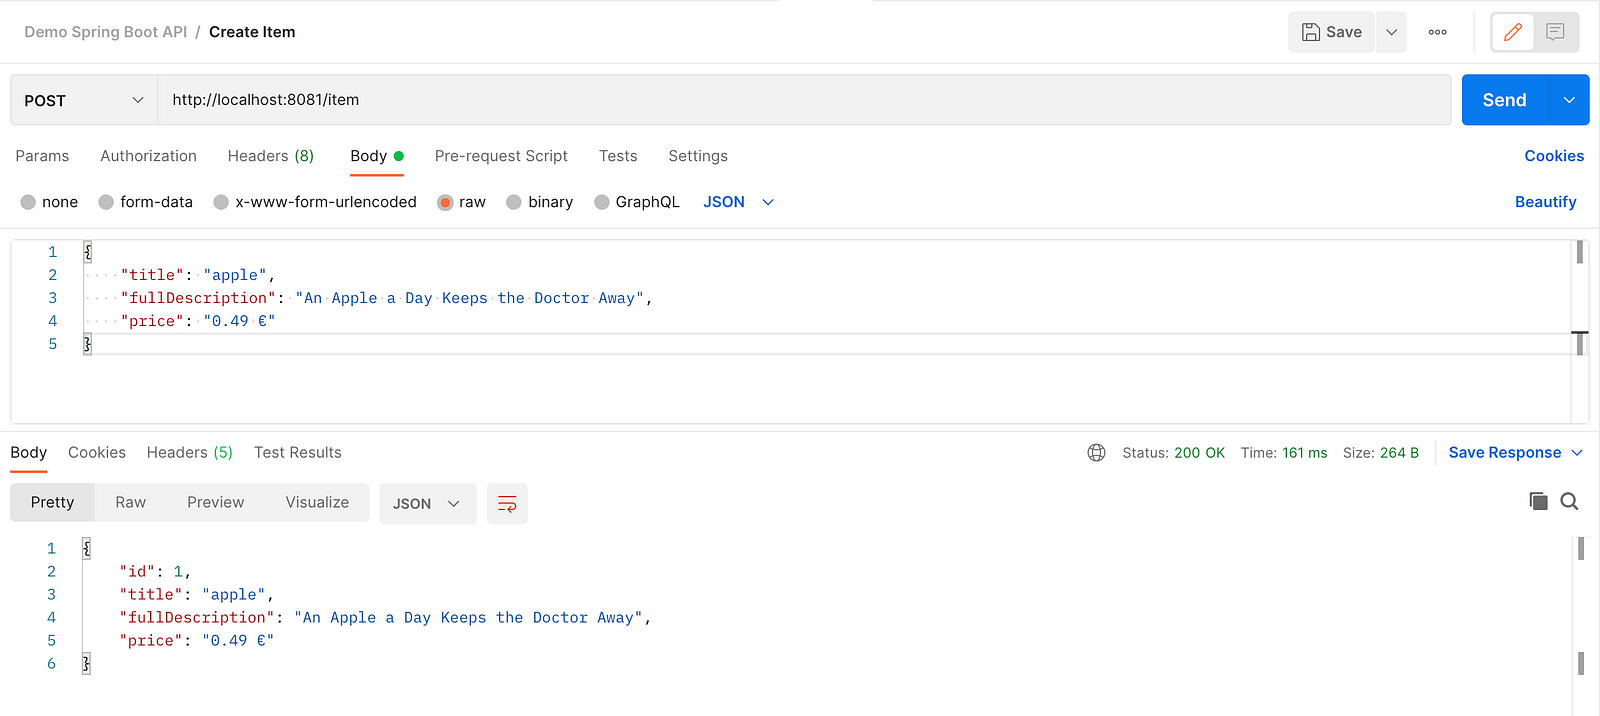


Now, test the other routes :)
Congratulations 🎉 Your API is working in a local environment. Now let’s deploy it!
Step 3 - Deploying your Database:
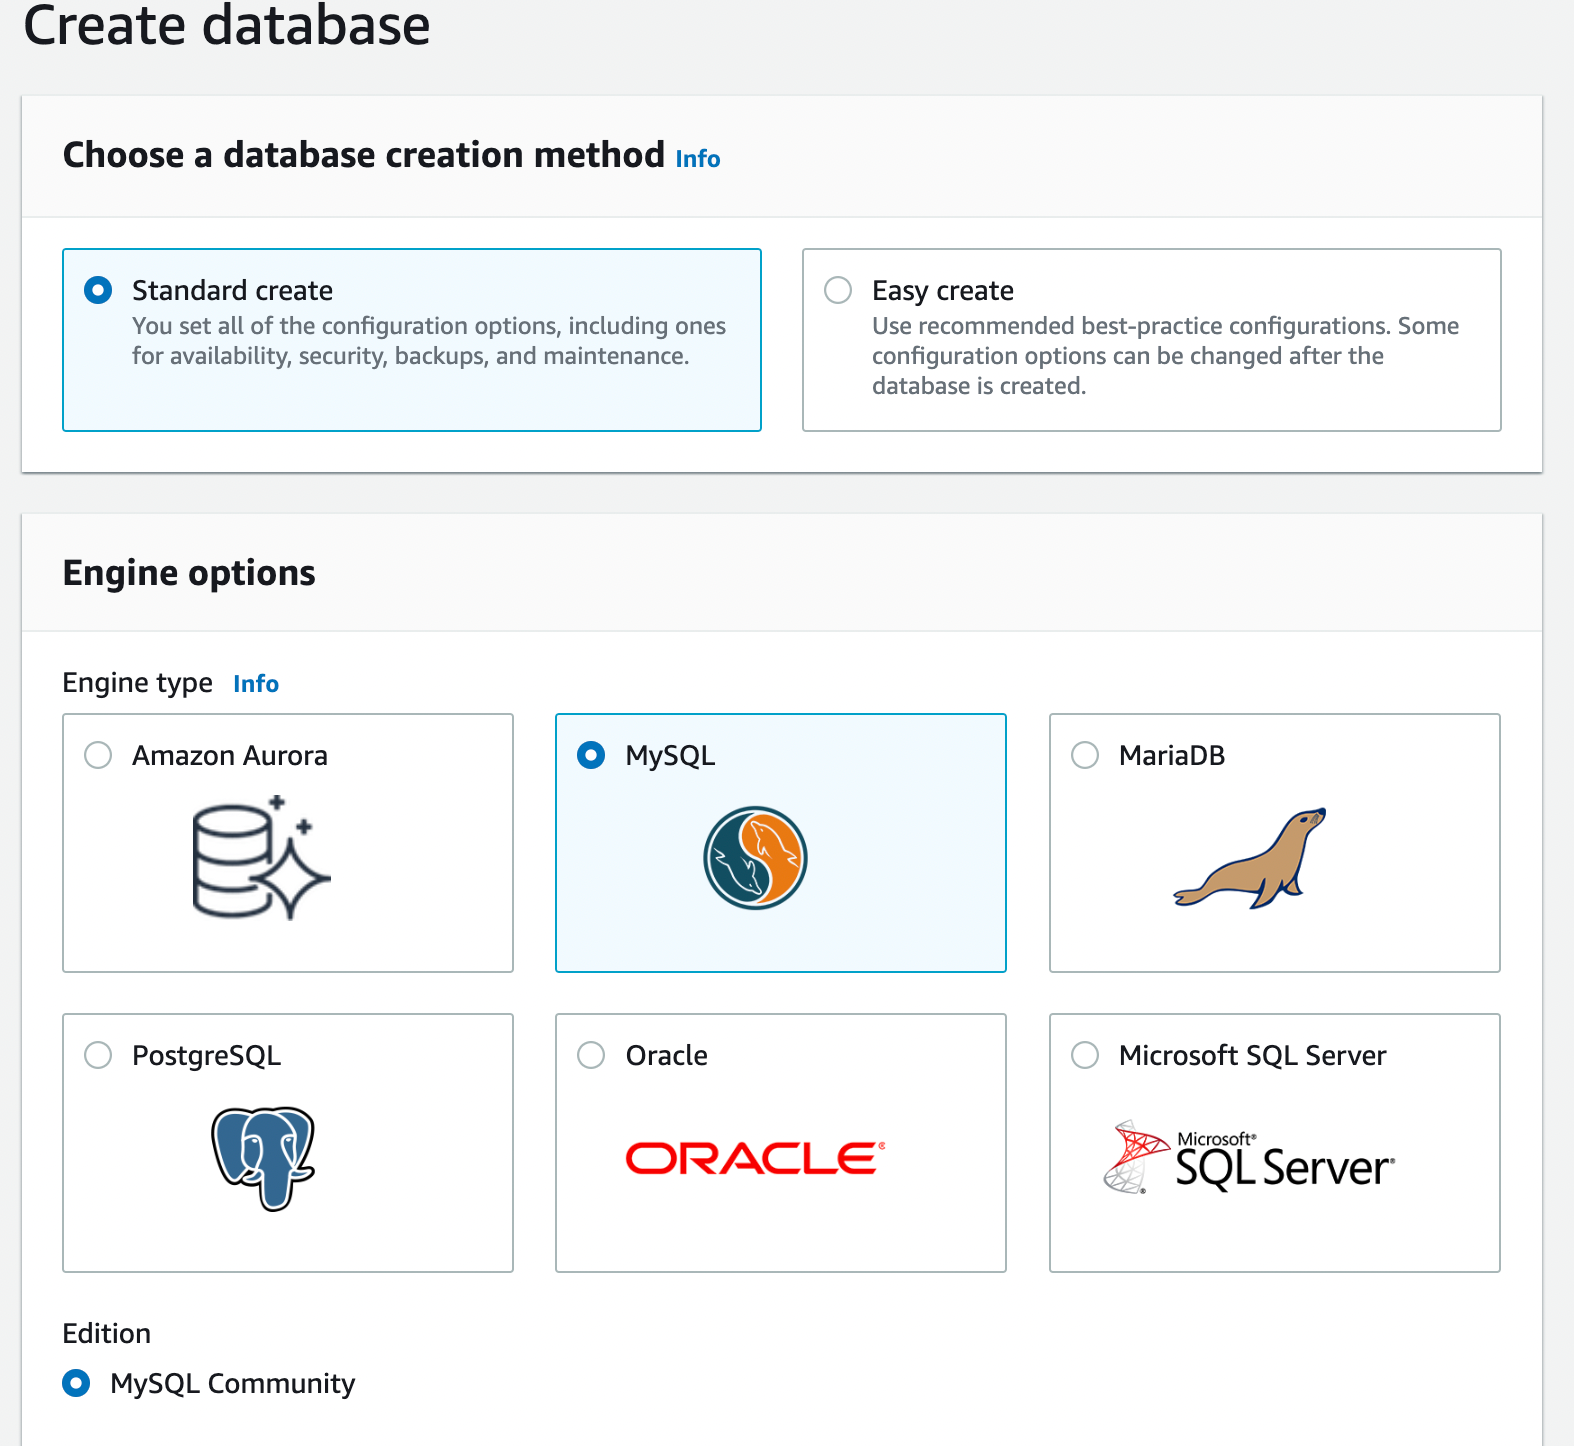
We will deploy our database using AWS, and more specifically RDS. RDS, meaning Relational Database Service is a service that will allow us to easily create and deploy a database.
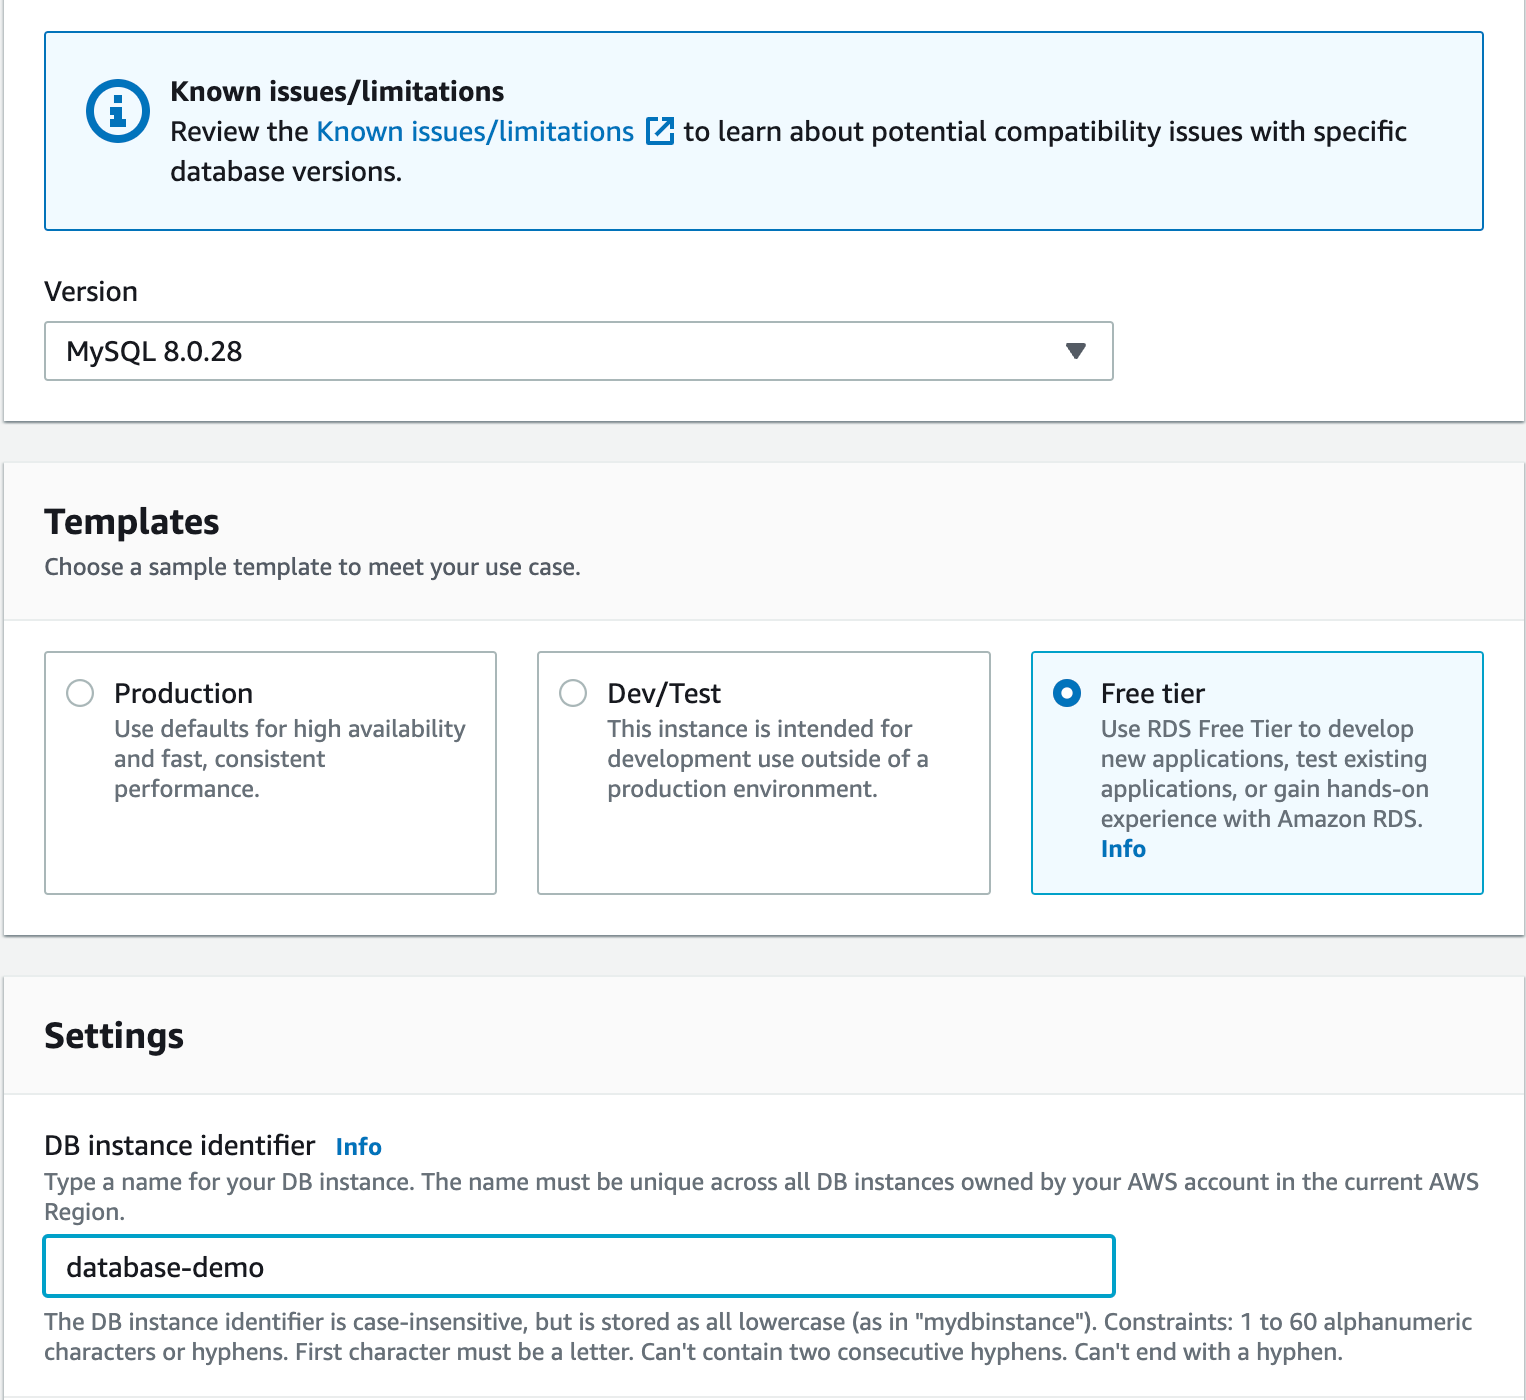
We will deploy a MySQL database, it’s a very common type of database and also one of the cheapest on AWS (it’s included in the free tier 😉).
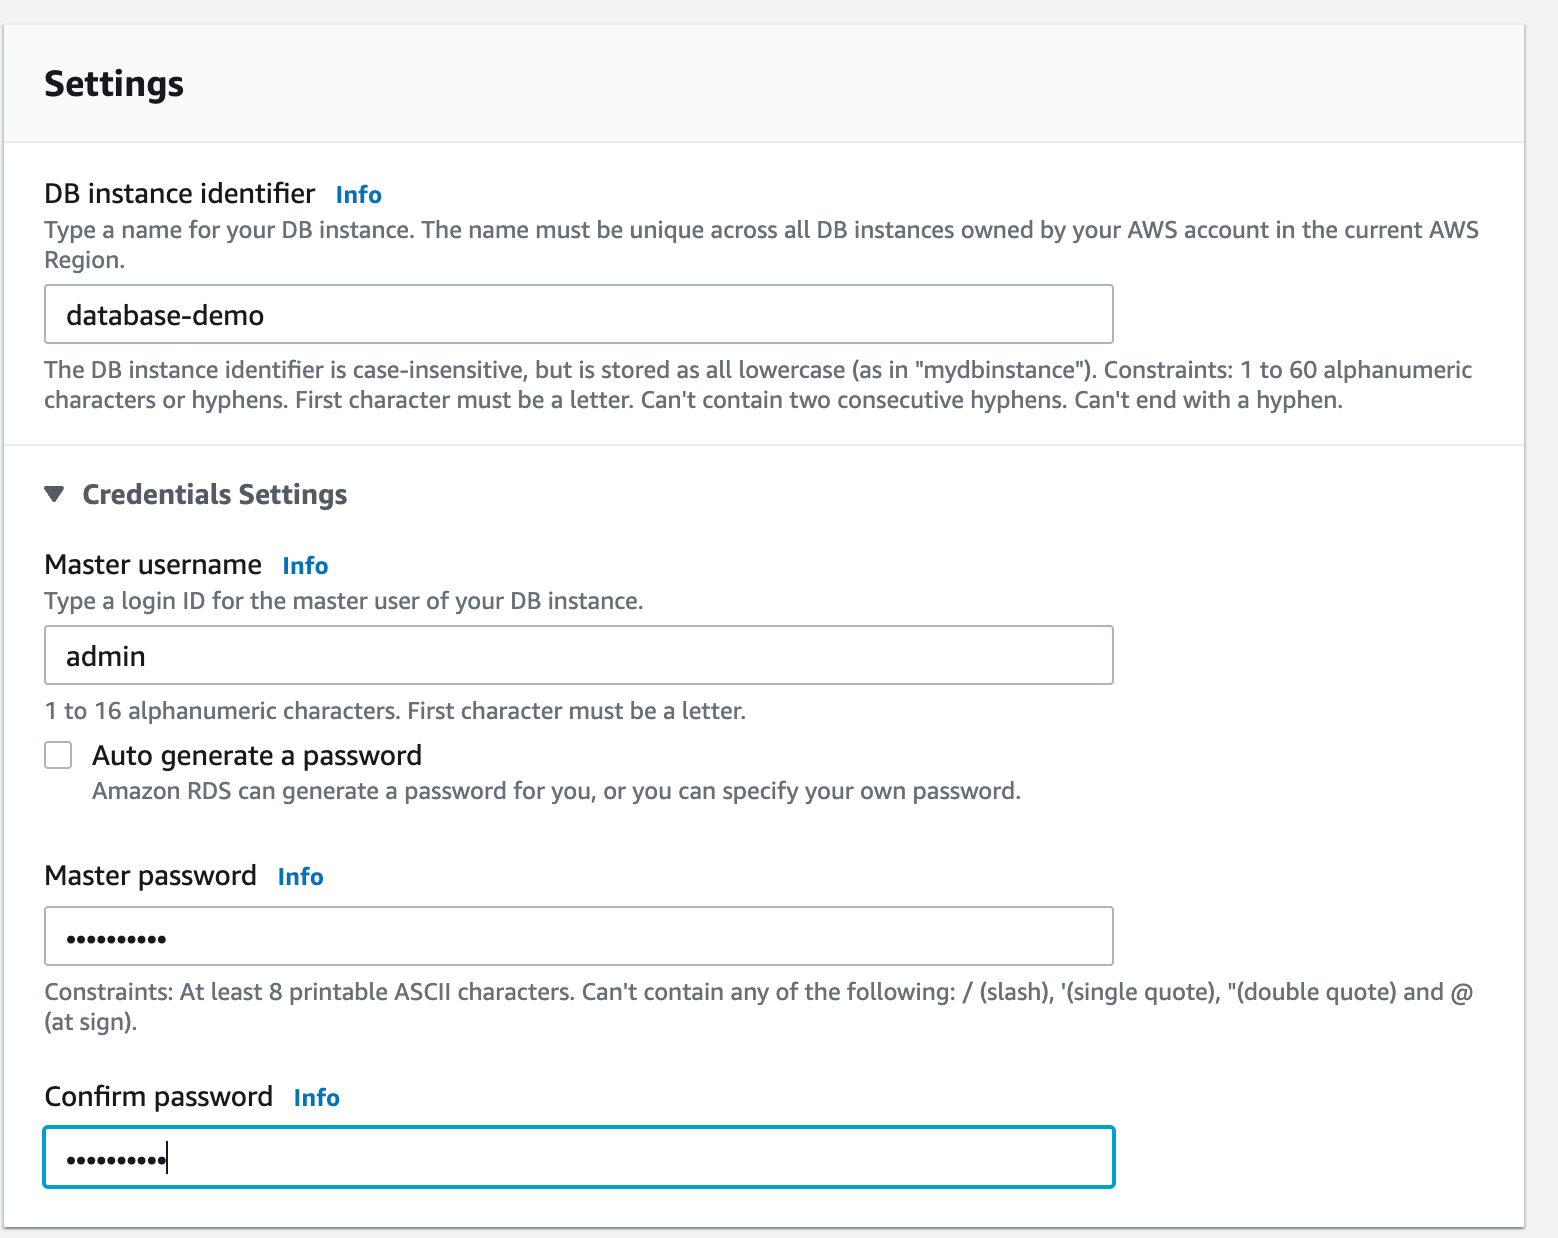
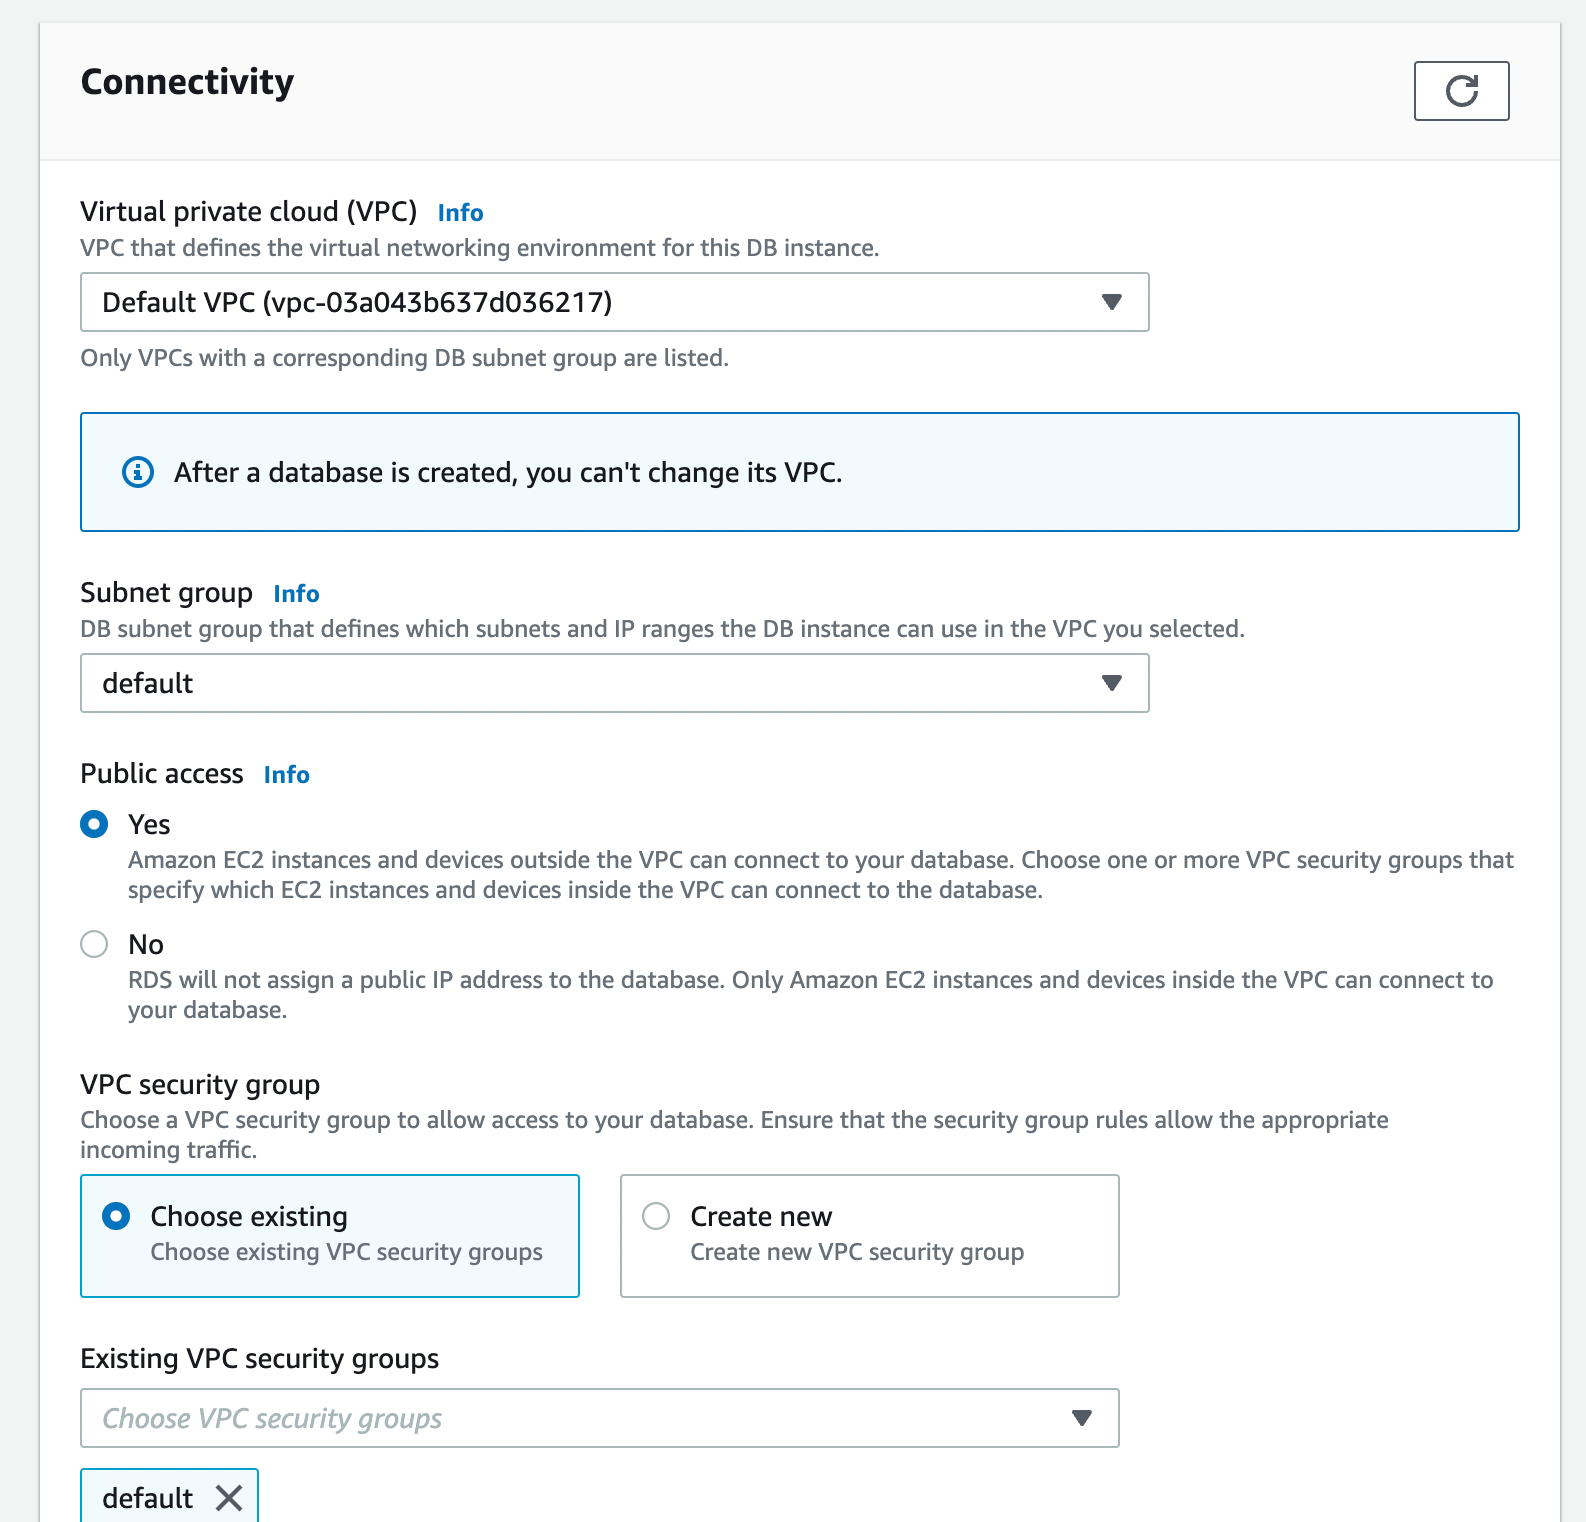
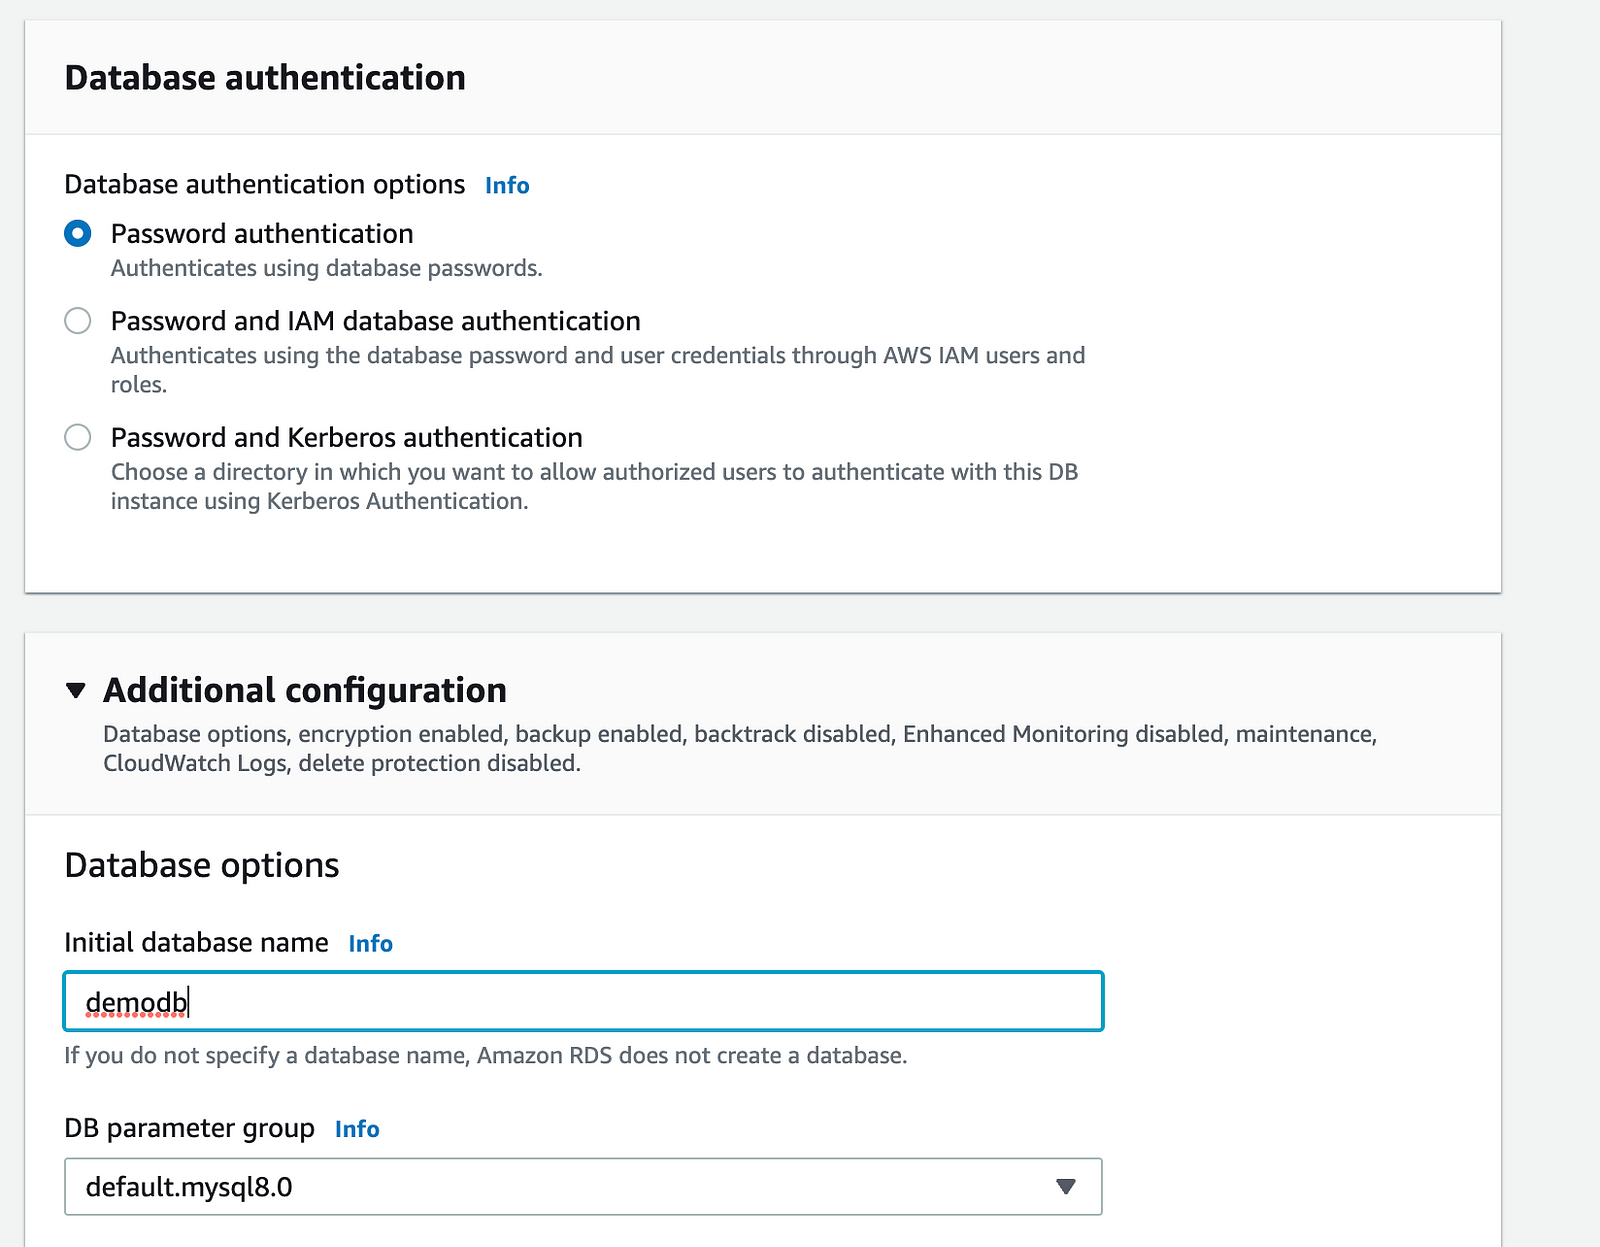
Connect to your AWS account, then follow these steps:

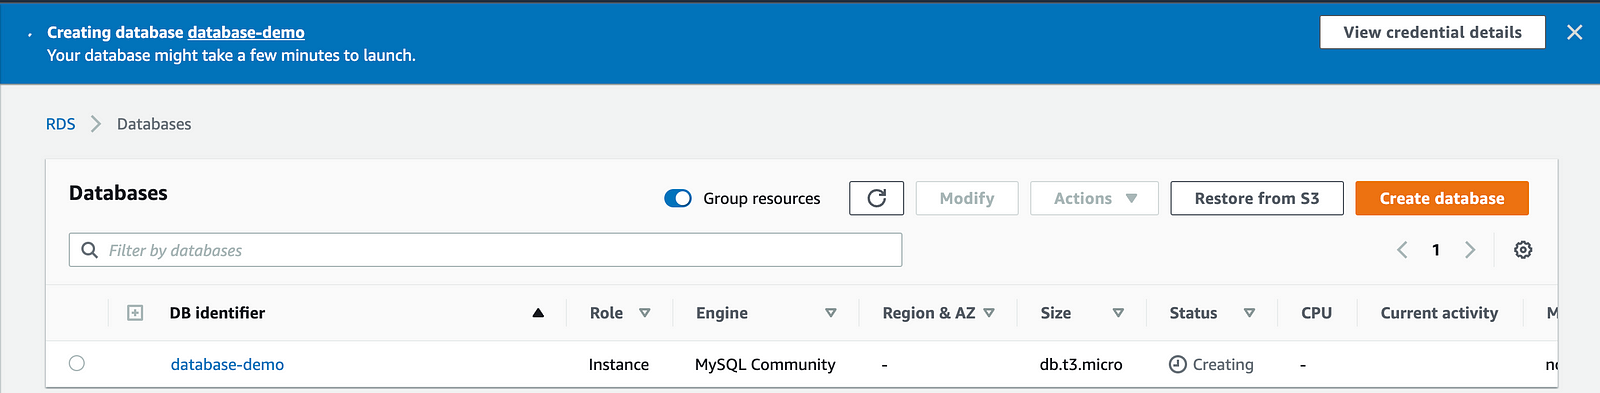
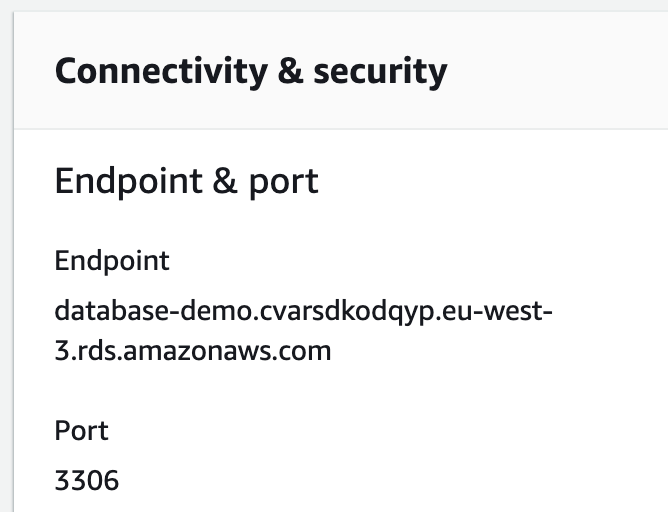
Please click on the newly created database. It will redirect you to a detailed page. Please note the endpoint, it’s the address of your database.
Now, your database has been created, but it will not be accessible to you. If we tried to connect to it using TablePlus, we would have an error. You need to edit the security rules to allow access from the outside.
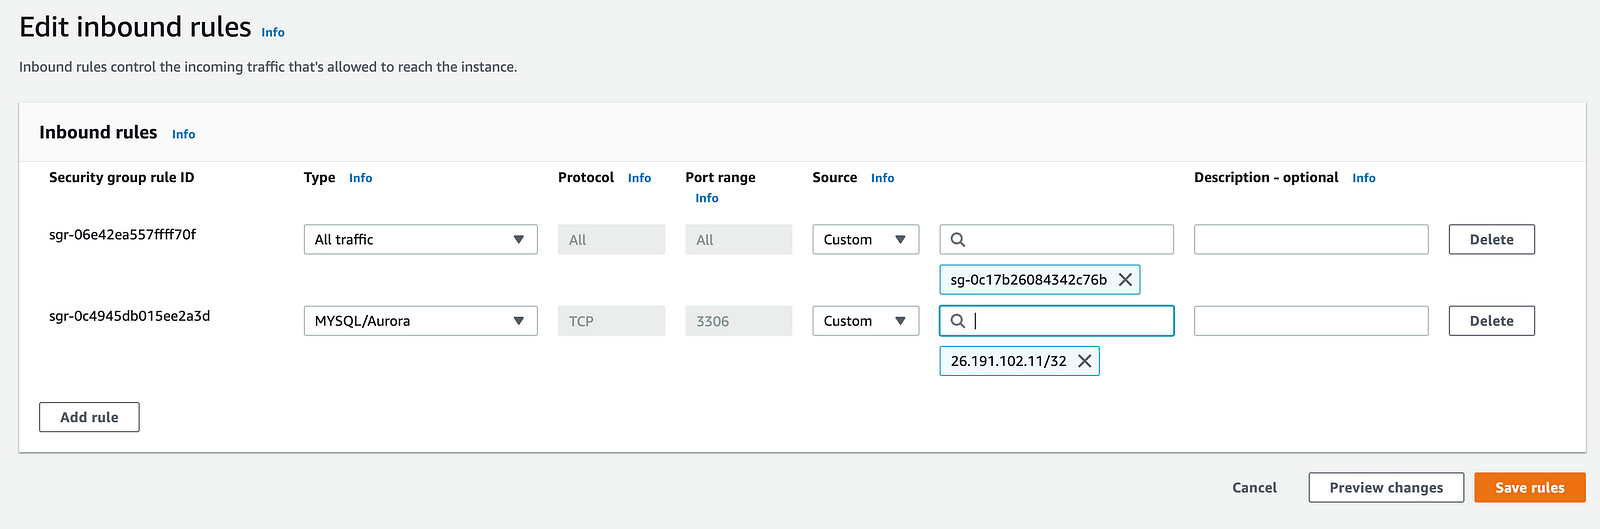
To change this, from the panel above in AWS, click on your database, then click on your VPC security groups. Then, click on Edit Inbound rules at the bottom of the file.

Then add an MYSQL/Aurora type. In the source, add your IP address. If you don’t know it, google “what’s my IP address”. Please note that only traffic coming from your current IP address will be allow to access your database. Your IP can change, for example, if you connect to the internet using a different network. In this case, you will need to add the new IP address to the security group
In some tutorials, you will find that you can add 0.0.0.0/0 as a source to allow access from any IP address. It is convenient as it will allow you to access your database from any network. However, it is a dangerous practice as your database is more vulnerable. Do not use it for a production database 😉.
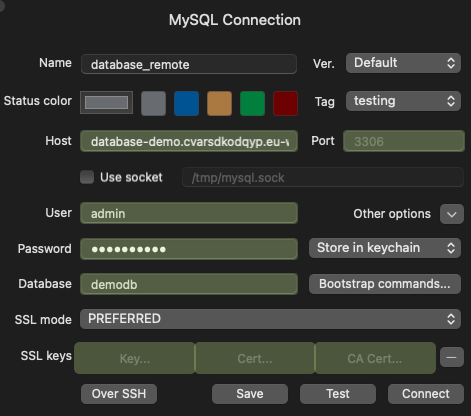
To check that our deployed database has been created with success, try to connect to it using TablePlus and the following parameters:
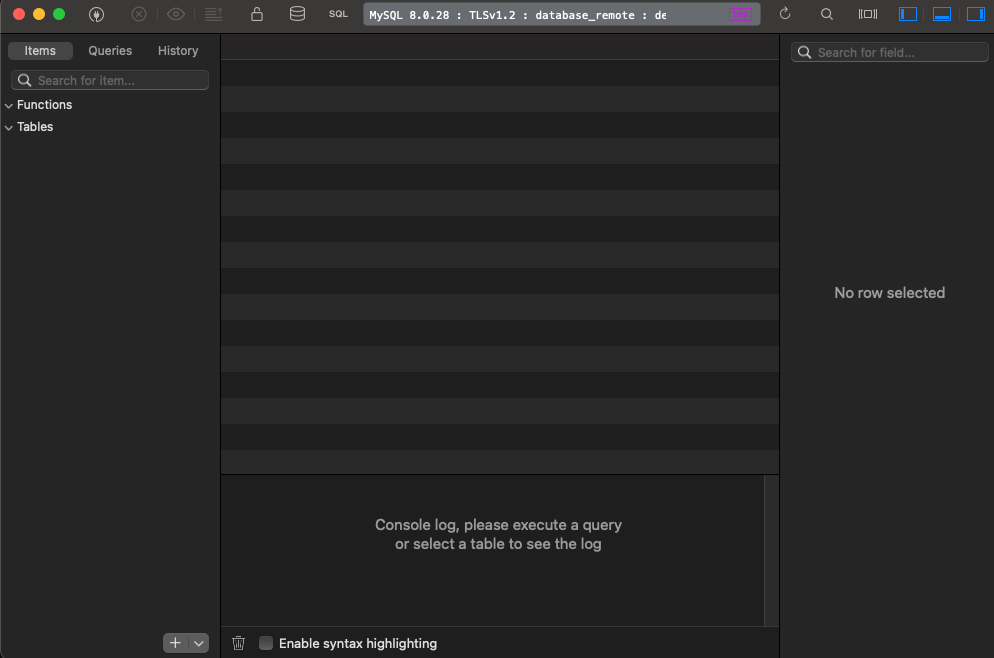
The connection should succeed and you should see the following in TablePlus:
Before deploying our API, we will make sure that our API can connect to the deployed database. Test it by uploading the values in application-properties file:
spring.datasource.driver-class-name=com.mysql.cj.jdbc.Driver

spring.datasource.url= jdbc:mysql://localhost:3306/db
spring.datasource.username=user
spring.datasource.password=password#Tomcat configuration
server.port=8081
For me, it is the following:

You should be able to launch your application. Then you will see in TablePlus that an (empty) item table has been created in the database.
Then test a few routes using postman as we did before to check it.
Writing a password in clear code is never a good idea. So as soon as the test is passed, revert your application properties. Do not commit this code, we will use a secure way to indicate the database properties when deploying our API.
Step 5 - Deploying our API on AWS:
To deploy our API on AWS, we will use BeanStalk. BeanStalk is an easy-to-use AWS service for deploying and scaling web applications and services.
The first thing to do is to create a Jar containing our app. For this, go into your project and type onto your terminal:
mvn clean package
It will generate a jar file.
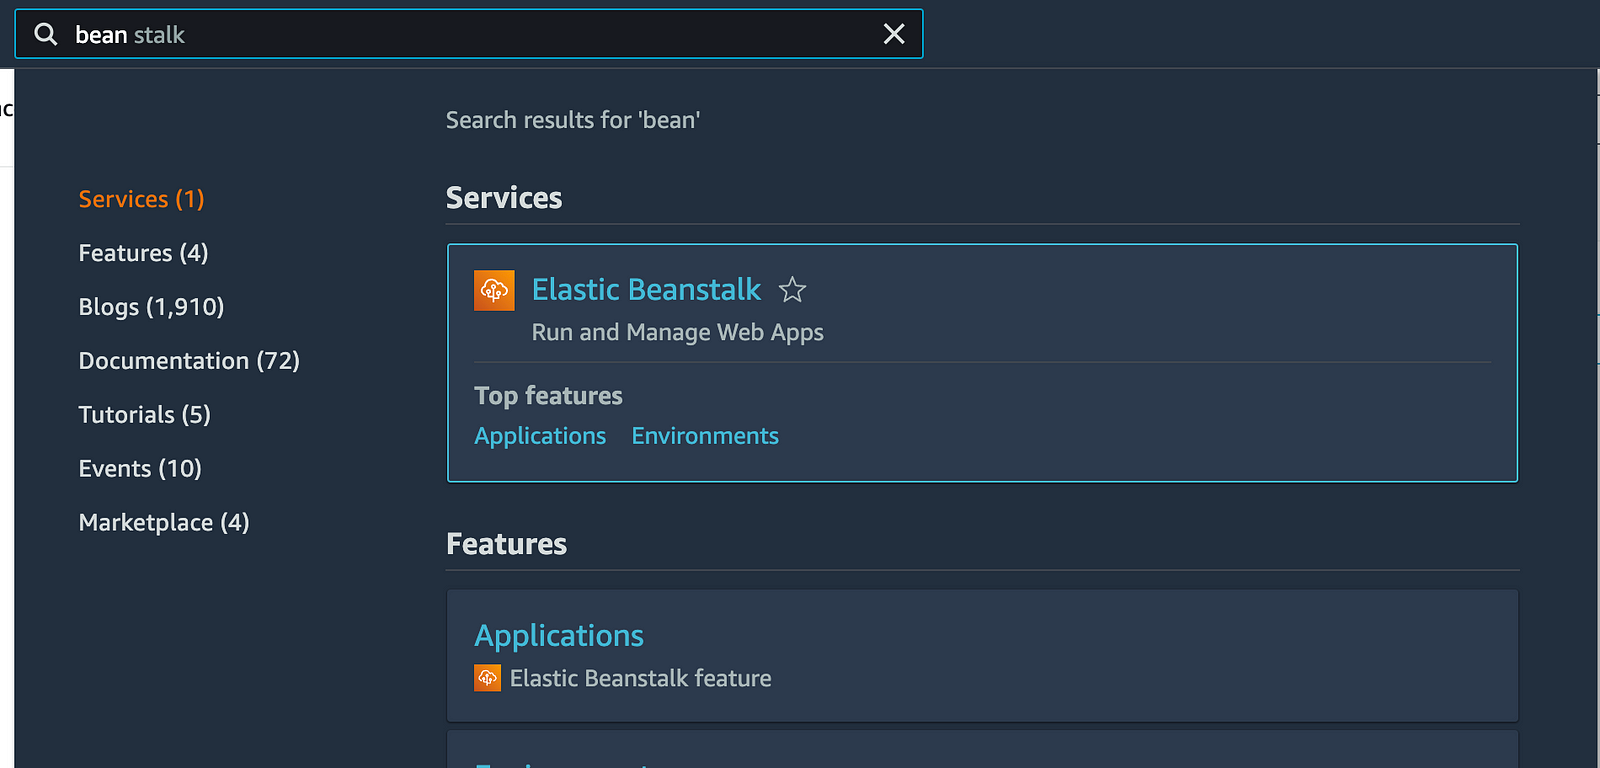
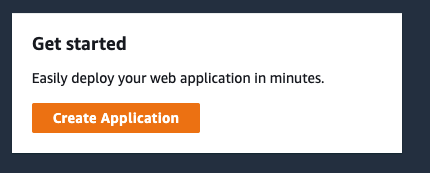
To deploy your app, go to the BeanStalk console on AWS and follows these steps:
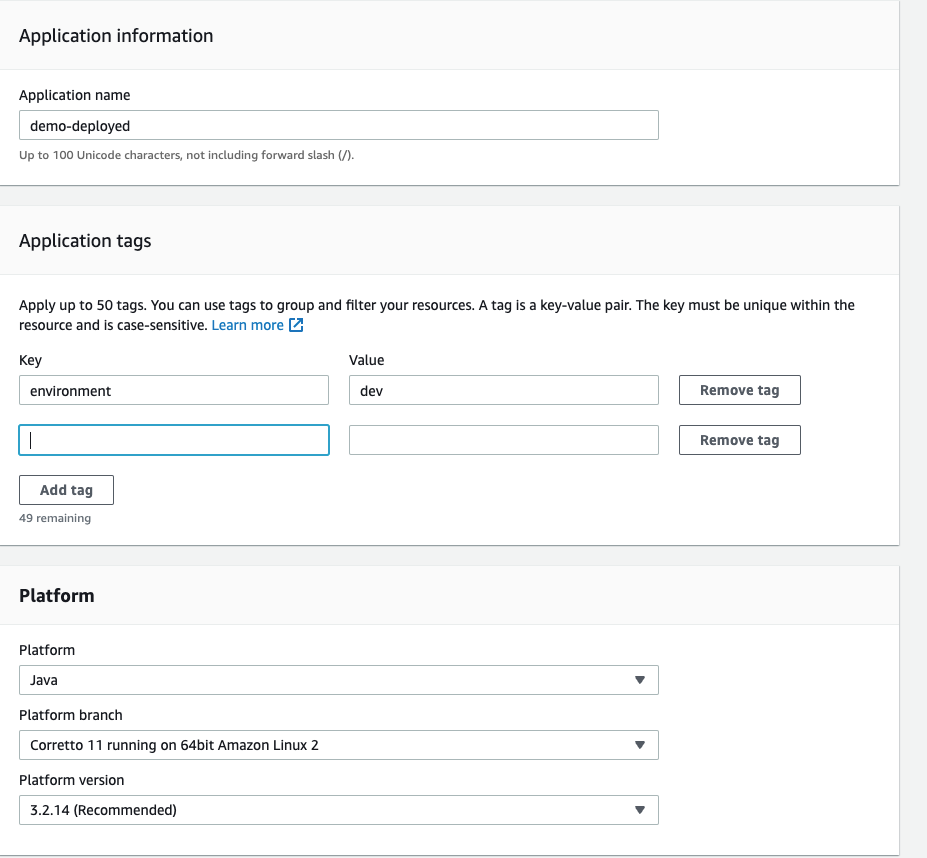
Then choose an application name and add some tags if you need it. (Used to better monitor your AWS accounts).
Select Java as a platform, and take the latest branch:
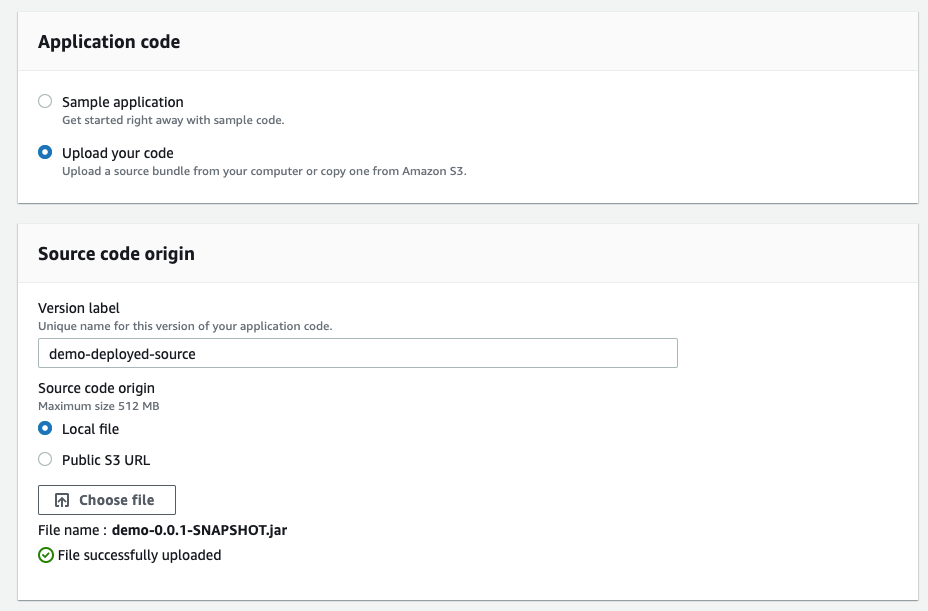
Then select Upload your code as we will be uploading our code. Then click on Choose file and choose the .Jar file that we have created by typing $mvn clean package. This file should be located in the target repository of your API.
Then click on create application.
Wait a few minutes until the creation is complete. Then we will add our application code tags. It’s important as it will override our properties set in application.properties. It is here that we will put the values necessary to connect to our deployed database.
For this, select configuration on the left tab then click on the edit button in software configuration.
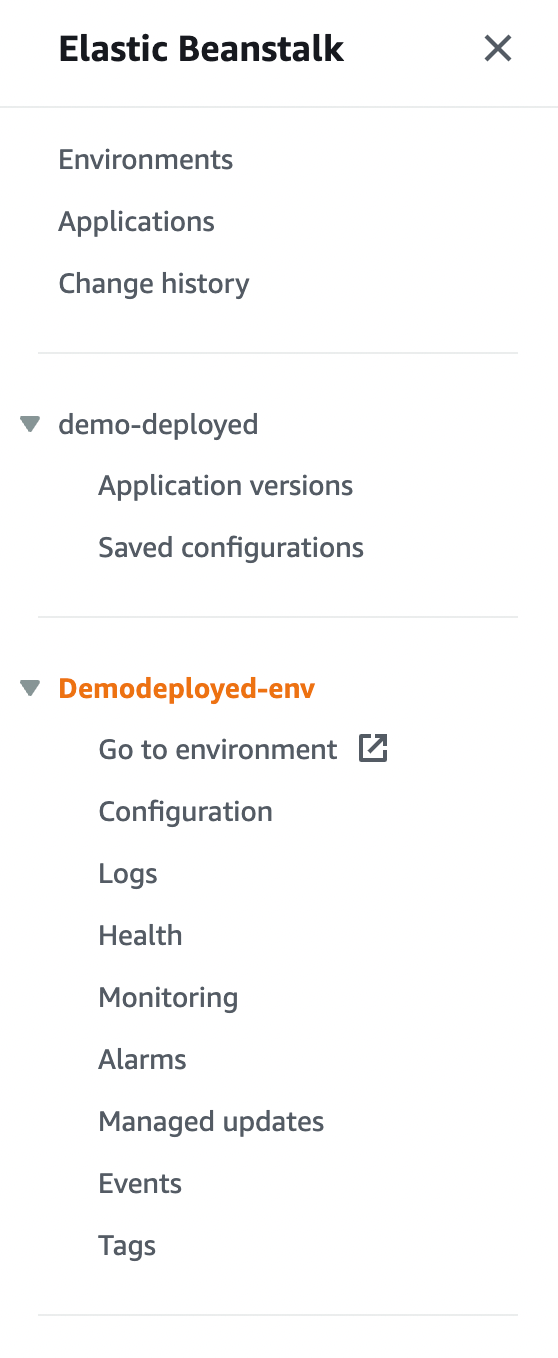
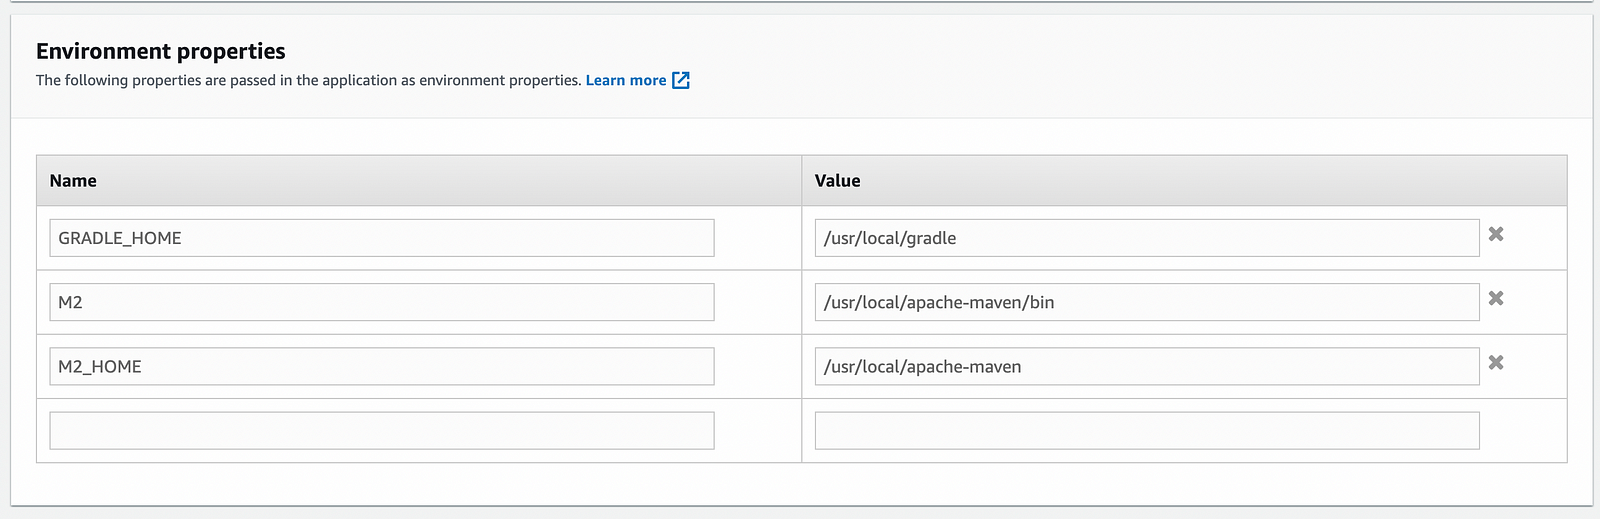
We can see that there are already 3 environment properties. We will add a few more.
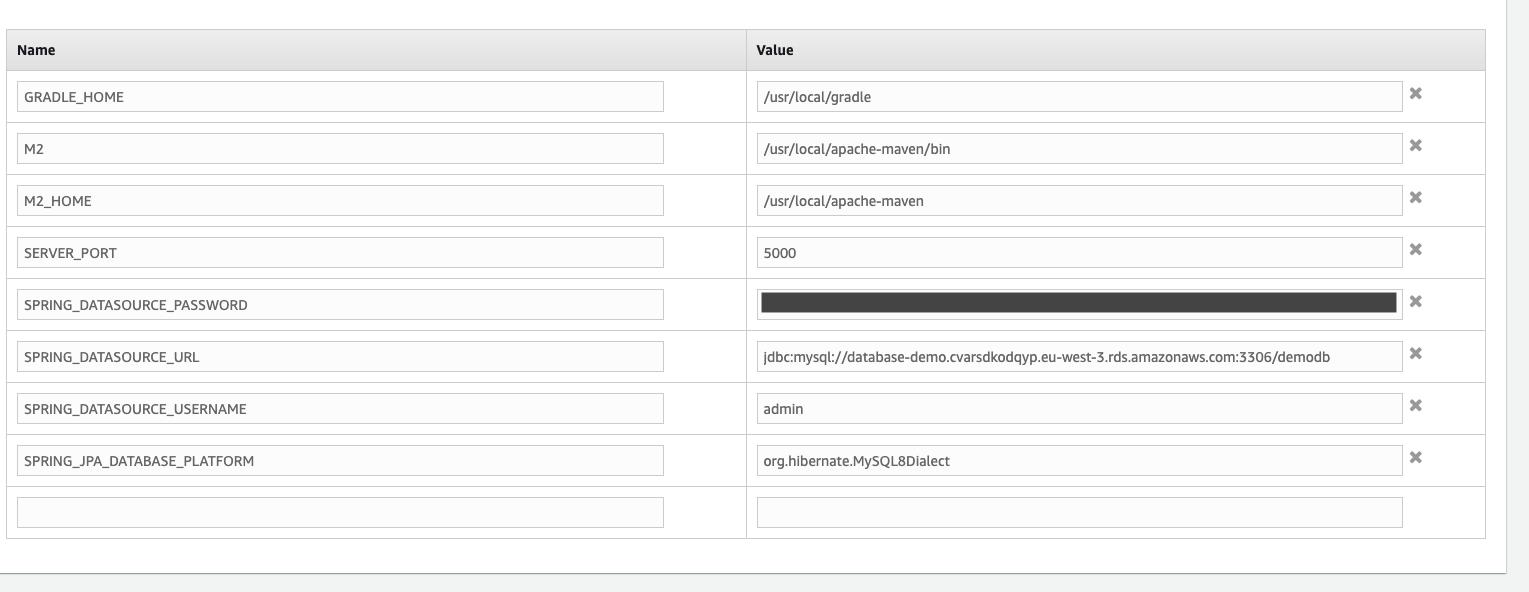
Add the following:
SERVER_PORT : 5000 (This is necessary as elastic beans have an Nginx reverse proxy that will forward incoming requests to internal port 5000).
SPRING_DATASOURCE_URL : <the URL of your database, as we put on the application.properties when we tested>
SPRING_DATASOURCE_USERNAME : <the user name of your database>
SPRING_DATASOURCE_PASSWORD: <the password of your database>
SPRING_JPA_DATABASE_PLATFORM : org.hibernate.dialect.MySQL8Dialect
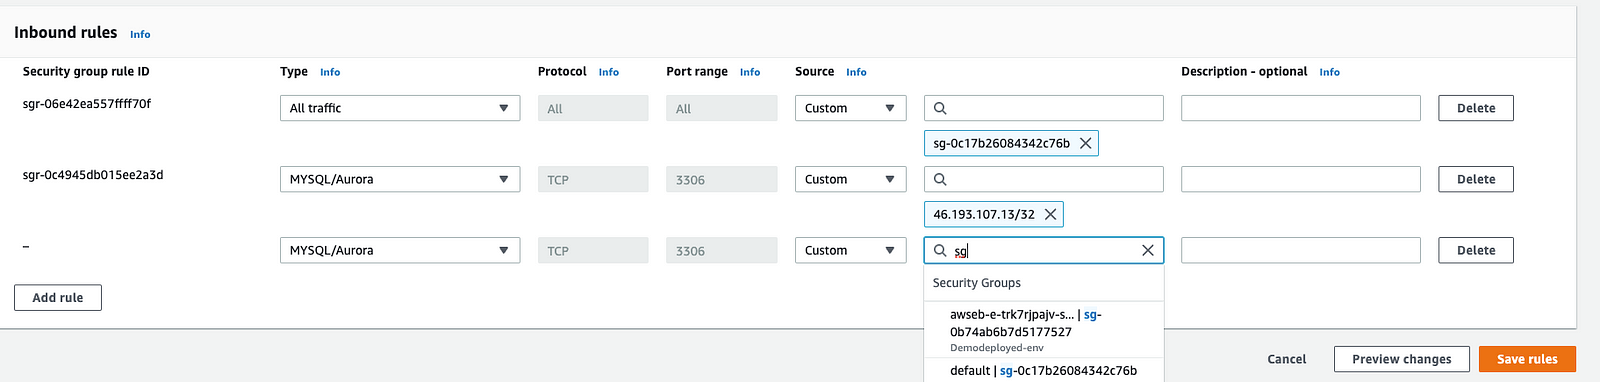
Then we will need to allow our API to have access to our database. For this, we will add it to the VPC security group of the database.
For this, go to the security rules of your RDS as we did before. And add the VPC of your elastic bean API to the inbound security rules (type sg to have security group autocomplete):
Then you can test it using Postman as you did before, but replace “localhost:8080” by your AWS endpoint. To find your AWS endpoint, go here:

Let’s try to access it in Postman:
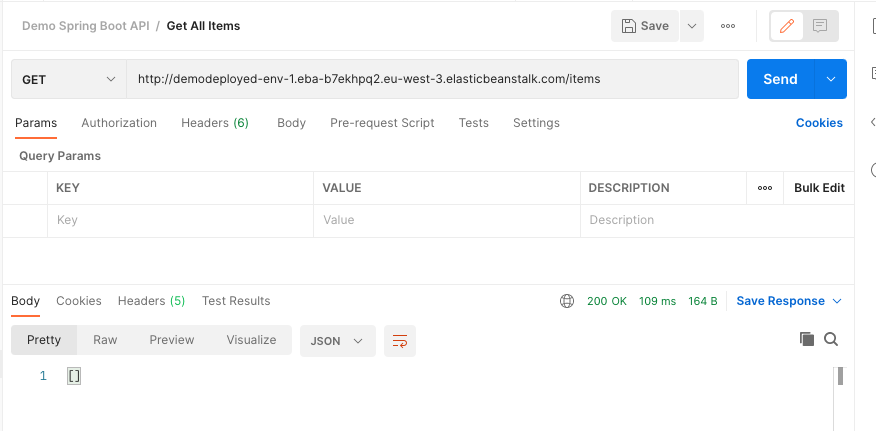
It’s working! Now, try to add some items and get them using postman.
Step 6 - Going further: Security and file uploads:
I hope that you enjoyed reading this article. For any questions, you can reach me at gauthierc@sipios.com.
