
Share this post


Chatbots are amazing at engaging customers. This tutorial gives an example on how to build a webhook from scratch to develop a chatbot with a real added value. Over the past year, I have been…
Chatbots are amazing at engaging customers. This tutorial gives an example on how to build a webhook from scratch to develop a chatbot with a real added value.
Over the past year, I have been developing chatbots from small ones that were simple quizzes to bigger ones that aimed at helping students to do temporary work. As a project grew and gained in complexity, it was getting harder to keep the interactions between the agent and its webhook readable and maintanable. How to manage the increasing the number of actions while keeping the code readable? How to handle asynchronous actions such as retrieving information of a user from a database? How to easily test the action handlers?
In this tutorial, I’m going to guide you step by step through the implementation of a complete webhook with Dialogflow and Node.js. We are going to build an awesome chatbot that will provide us information on cryptocurrencies when asked for!
Before starting, I make these assumptions on what you already know:
- You are familiar with the basic concepts of a chatbot such as Intents, Entities, Events, and Contexts
- You know how to restore an agent from a zipped one in the Dialogflow console
- You know how to link an agent to its webhook
- You know how to test your webhook locally (with ngrok) or to push it online (on Heroku)
Make sure you are comfortable with these steps because they won’t be covered in this tutorial. We’re good to go.
As this tutorial focuses on the backend part, we’re going to keep the agent brain-dead simple. The chatbot has one mission: to find the price of a cryptocurrency. If the chatbot can’t find any information on the cryptocurrency, it lets the user know
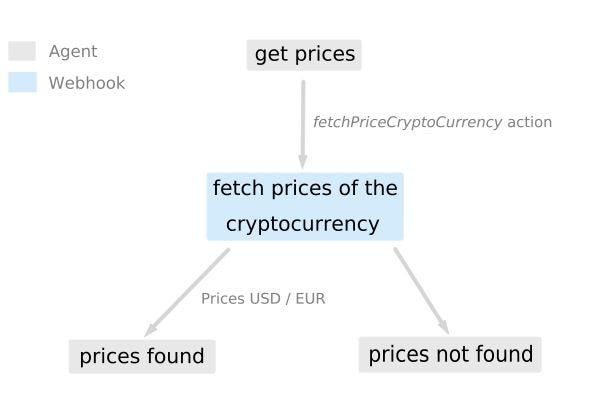
In this scenario, 3 intents do the trick:
- One to retrieve the cryptocurrency the user is interested in
- One to give the price of the cryptocurrency if the chatbot could find some information
- One to tell the user that the chatbot couldn’t find any information
You will be able to test the agent directly from the Dialogflow console. And because I won’t focus on how to build an agent, here is the zipped one I’m going to use:
Make sure your agent uses the V1 API version. It can be set from the settings of the agent.
Let’s say we have an agent that can trigger the action fetchPriceCryptoCurrency to fetch some information about a cryptocurrency. The name of the cryptocurrency is provided as the symbol parameter along with the action.
Our server at the moment is basic and will grow as we step through the tutorial. Create a directory on your computer and paste into it the two files below. To install the dependencies run npm install from within the directory. Then launch the project with npm start.
{
name: "crypto-chatbot",
version: "1.0.0",
description: "A brain-dead simple crypto chatbot",
main: "server.js",
scripts: {
start: "node server.js"
},
author: "YourNameRightHere",
dependencies: {
body-parser: "^1.17.2",
express: "^4.15.4"
}
}
{
'use strict'
let express = require('express')
let app = express()
let bodyParser = require('body-parser')
// These two following lines ensures that every incomming request
// is parsed to json automatically
app.use(bodyParser.urlencoded({ extended: 'true' }))
app.use(bodyParser.json())
// Allow access to resources from any origin and any headers. As we want
// the agent to reach the webhook and not bother with CORS, they are fully
// permissive
app.use((req, res, next) => {
res.header('Access-Control-Allow-Origin', '*')
res.header('Access-Control-Allow-Headers', '*')
next()
})
// The server is now listening on the port 8080
app.listen(8080)
console.log('info', `server listening on port 8080`)
{
Crypto Chatbot
|- package.json
|- server.js
Here we set up a server with express that listens on port 8080.
If you’re not comfortable with the concept of webhooks, think of it as the backend part of a web app. It acts as a microservice and holds the logic of the application. In this comparison, the agent is the frontend part of the chatbot. The agent handles the discussion flow but can’t perform any logical actions such as sending an email or retrieving information from a database. That’s why the agent needs a side kick that can be trusted to perform the actions it is asked for: the webhook.

To ask the webhook to perform actions, the agent sends a http request that contains the name of the action to perform and the parameters required to perform the action. In our case, the action is fetchPriceCryptoCurrency and its required parameter is the symbol of the cryptocurrency. Think of the actions as different endpoints of your microservice. The webhook performs the action and returns a response that contains the information the agent was looking for.
To handle the requests from the agent, we have to add a route in the router and define the function that will be executed when the endpoint is hit:
{
'use strict'

let express = require('express')
let app = express()
let bodyParser = require('body-parser')

/***** NEW *****/
// Require the module webhook/index.js
let webhook = require('./webhook')
/***************/

// These two following lines ensures that every incomming request
// is parsed to json automatically
app.use(bodyParser.urlencoded({ extended: 'true' }))
app.use(bodyParser.json())

// Allow access to resources from any origin and any headers. As we want
// the agent to reach the webhook and not bother with CORS, they are fully
// permissive
app.use((req, res, next) => {
  res.header('Access-Control-Allow-Origin', '*')
  res.header('Access-Control-Allow-Headers', 'Origin, X-Requested-With, Content-Type, Accept')
  next()
})

/***** NEW *****/
// Handle POST http requests on the /webhook endpoint
app.post('/webhook', webhook)
/***************/

// The server is now listening on the port 8080
app.listen(8080)
console.log('info', `server listening on port 8080`)
Now, every request made by the agent to the endpoint https://<your_server_name>/webhook will be handled by the function defined in the webhook module right below:
{
'use strict'

const webhook = (req, res) => {
  let body = req.body

  // Retrieving parameters from the request made by the agent
  let action = body.result.action
  let parameters = body.result.parameters

  // Performing the action
  if (action === 'fetchPriceCryptoCurrency') {
    // Fetch the price of the cryptocurrency
    let price = ...
    let response = ...
  }

  // Sending back the results to the agent
  res.json(response)
}

module.exports = webhookfetchPriceCryptoCurrency is handled in an if-caseIf we want to handle more actions we only have to add more cases like this:
{
// Performing the action
if (action === 'fetchPriceCryptoCurrency') {
  ...
} else if (action === 'buyCryptoCurrency') {
  ...
} else {
  // Stuff to do if a triggered action has no handler
  console.error(`unhandled action ${action}`)
}
The new structure of the project is:
Crypto Chatbot
|- webhook
|- |- index.js
|- package.json
|- server.js
Ok nice! It looks good. Let’s dive into the implementation of the request to fetch STOP! No. It is not nice and it doesn’t look good. I fooled you.

The way we handled the actions is the reason why I am writing this tutorial. What we did is the most simple way to do it and it works well as long as the project stays small. But what happens when it grows and the number of actions to handle increases? You end up flooded with an unreadable if-case. How to check the presence of every required parameters for each action? You end up with tons of sub if-cases. How to handle both synchronous and asynchronous actions as they inherently behave differently? How to even test an action to be sure that it works as expected? As action handlers are intertwined, a minor modification to one of them can break the tests of others. It is a mess! And it can be easily avoided.
The main problem of the structure above is that all action handlers are implemented in the same file. These handlers may have different structure as some are synchronous and others asynchronous. To solve this problem, we are going to use a powerful tool from the javascript toolbox: the `Promise`s. If you don’t know what a Promise is or how to use them, take the time to read this amazing article by Eric Elliott. It is truly enlightening.
This is how the handling of actions is going to work:
- Instead of having a piece of if-case for each handler, each handler will be implemented in its own dedicated file
- Instead of having a huge unreadable if-case, we are going to use an object to store all the handlers, where the keys are the name of the actions and the values the handlers
- To handle asynchronous actions seamlessly, every handler will be Promise-based
Enough talking, let’s put it into practice to have a better understanding of how it works.
First, we are going to create a folder to store the handlers. Then we’re going to create our first handler:
Crypto Chatbot
|- webhook
|- |- handlers
|- |- |- core
|- |- |- |- fetchPriceCryptoCurrency.js
|- |- index.js
|- package.json
|- server.js
As you can see, a handlers folder has been created inside the webhook one. We also have a core folder inside the handlers one. This way, we will be able to categorize the handlers depending on their use. I use the core folder to handle actions that are directly related to the functionalities of the chatbot, such as the fetchPriceCryptoCurrency.js that retrieves the price of a cryptocurrency. For example, we can also use a validators category to store all the handlers that are used to check the user’s input, like checking the user’s age or rejecting yopmail email addresses. The categorization is up to you and helps to structure the project.
'use strict'

const handler = (interaction) => {
  return new Promise((resolve, reject) => {
    // Check for parameters
    if (!interaction.parameters.hasOwnProperty('symbol')) {
      reject(new Error('missing symbol parameter for action fetchPriceCryptoCurrency'))
    }

    // Fetch the price of the cryptocurrency
    let price = ...
    interaction.response = ...

    // Indicate the action has been performed successfully
    resolve()
  })
}

module.exports = handler
This is the skeleton of our first Promise-based action handler! Here is what we do:
symbol parameter is missing, the Promise is rejected with an errorOk, and what about the interaction argument of the handler?
Relevant question. You remember the lines in the webhook/index.js file where we retrieved the action and the parameters from the agent’s request?
Remembering the two lines from webhook / index.js
// Retrieving parameters from the request made by the agent
let action = body.result.action
let parameters = body.result.parameters
Yeah, these ones. The interaction argument is a simple object that contains those parameters. It is built in the webhook/index.js and passed to the handler. Here is the new webhook/index.js:
// Load the fetchPriceCryptoCurrency handler
let corefetchPriceCryptoCurrency = require('./handlers/core/fetchPriceCryptoCurrency')

// Add the handler to the handlers object
// The keys are the name of the actions
// The values are the handlers
let handlers = {
  'core/fetchPriceCryptoCurrency': corefetchPriceCryptoCurrency
}

// Function that selects the appropriate handler based on the action triggered by the agent
const interactionHandler = interaction => {
  // Retrieve the handler of the triggered action
  let handler = handlers[interaction.action]

  // If the action has a handler, the Promise of the handler is returned
  if (handler) return handler(interaction)

  // If the action has no handler, a rejected Promise is returned
  else return Promise.reject(new Error(`unhandled action ${interaction.action}`))
}

// Function that handles the request of the agent and sends back the response
const requestHandler = (req, res) => {
  let body = req.body

  // Build the interaction object
  let interaction = {
    action: body.result.action,
    parameters: body.result.parameters,
    response: {}
  }

  // Handle the Promise returned by the action handler
  interactionHandler(interaction)
  .then(() => {
    // If the action handler succeeded, return the response to the agent
    res.json(interaction.response)
  })
  .catch(e => {
    // If the action handler failed, print the error and return the response to the agent
    console.log(e)
    res.json(interaction.response)
  })
  // In both cases, whether the Promise resolves or is rejected, the response is sent back
  // to the agent
}

module.exports = requestHandler
The interaction.response object is built by the handler based on the documentation of Dialogflow (V1 API). It can contain the followup event to trigger a specific intent on the agent’s side, the messages to send back to the messaging platform or the new contexts of the conversation.
The roles of the two functions requestHandler and interactionHandler are distinct. The former handles the request made by the agent. Its job is to receive the request and send back a response to the agent. The latter focuses on selecting the right handler to perform the requested action and to build the response that will be sent to the agent.
Note that in the object of handlers the fetchPriceCryptoCurrency handler is now associated to the core/fetchPriceCryptoCurrency action instead of the fetchPriceCryptoCurrency one. The agent will now have to trigger the core/fetchPriceCryptoCurrency action to get the price of a cryptocurrency. Once again, this refactorization is made to improve the readability in the console of Dialogflow. At a glance we now know that the intent triggers a core action.
The price of a cryptocurrency can be retrieved by making a call to the CryptoCompare API. We’re going to use axios to make the http request. Install it with npm i --save axios.
based on the doc of the endpoint we’re going to call, here is the request with axios:
// Fetch the price of the cryptocurrency
axios
  .get(`https://min-api.cryptocompare.com/data/price?fsym=${symbol}&tsyms=USD,EUR`)
  .then(axiosResponse => {
    // Retrieve the prices from the response object, in USD and EUR
    let prices = axiosResponse.data

    // Check if the API returned an error
    if (prices.Response && prices.Response === 'Error') {
      // The API returned an error
      // So build the response object to trigger the failure intent
      interaction.response.followupEvent = {
        name: 'prices-not-found',
        data: {}
      }
    } else {
      // The prices have been successfully retrieved
      // So build the response object to trigger the success intent
      interaction.response.followupEvent = {
        name: 'prices-found',
        data: {
          USD: prices.USD,
          EUR: prices.EUR
        }
      }
    }

    // Resolve the Promise to say that the handler performed the action without any error
    resolve()
  })
  .catch(e => {
  // An error occured during the request to the API
  // Reject the Promise to say that an error occured while the handler was performing the action
  reject(e)
  })
First we perform a GET request to the https://min-api.cryptocompare.com/data/price endpoint. The .get method of axios returns a Promise that resolves with the http response axiosResponse. The data returned is contained in the axiosResponse.data object. It is an object that contains the currencies as keys and the price of the cryptocurrency in that currency as values. Here we have two keys: USD and EUR.
Then we check if the call to the API succeeded. If there is no error, we can set the followup event to prices-found. This will trigger the intent on agent’s side that sends the prices of the cryptocurrency to the user. If there is an error, we set the followup event to prices-not-found to trigger the intent that tells the user that the chatbot could not find any information. In both cases, the interaction.response object is built.
Finally, the Promise resolves to say that the handler performed the action without any error.
Here is the final version of our fetchPriceCryptoCurrency handler:
'use strict'

let axios = require('axios')
const handler = (interaction) => {
  return new Promise((resolve, reject) => {
    // Check for parameters
    if (!interaction.parameters.hasOwnProperty('symbol')) {
      reject(new Error('missing symbol parameter for action fetchPriceCryptoCurrency'))
    }
    let symbol = interaction.parameters['symbol']

    // Fetch the price of the cryptocurrency
    axios
      .get(`https://min-api.cryptocompare.com/data/price?fsym=${symbol}&tsyms=USD,EUR`)
      .then(axiosResponse => {
        // Retrieve the prices from the response object, in USD and EUR
        let prices = axiosResponse.data

        // Check if the API returned an error
        if (prices.Response && prices.Response === 'Error') {
          // The API returned an error
          // So build the response object to trigger the failure intent
          interaction.response.followupEvent = {
            name: 'prices-not-found',
            data: {}
          }
        } else {
          // The prices have been successfully retrieved
          // So build the response object to trigger the success intent
          interaction.response.followupEvent = {
            name: 'prices-found',
            data: {
              USD: prices.USD,
              EUR: prices.EUR
            }
          }
        }

        // Resolve the Promise to say that the handler performed the action without any error
        resolve()
      })
      .catch(e => {
        // An error occured during the request to the API
        // Reject the Promise to say that an error occured while the handler was performing the action
        reject(e)
      })
  })
}

module.exports = handler
Great! We now have a fully working webhook. You can test the chatbot by creating an agent on Dialogflow and ask what is the value of bitcoin in the console.
Here is the repository of the project: https://github.com/Baboo7/node-dialogflow-webhook-boilerplate.
Using Promise-based handlers will help you build scalable chatbots as it improves:
- Readability: a handler has its own dedicated file
- Asynchronicity handling: having Promise-based handlers make the call to a database / an external API seamless
- Testability: a handler can be easily tested
